I really like the look of Wilton’s 3D Bunny Cake Pan, so I was excited to try out my first bunny-shaped cake when I discovered one small problem with the pan: it doesn’t come with a recipe. Instead, it comes with decorating suggestions and simply states that you’ll need 4 1/2 cups of pound cake batter to make the cake. This was a bit of a problem for me because, let’s face it, it is much easier to bake a cake that is the right size for a given pan. I didn’t want to take the risk of starting off with a too-small recipe that couldn’t be sure would rise up enough to fill up the pan. So, I picked a high-rising variation on a pound cake recipe I like and scaled it down to fit the pan.
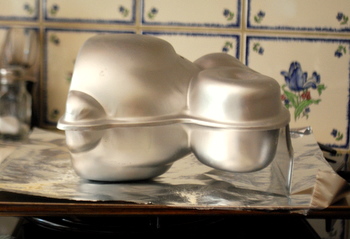
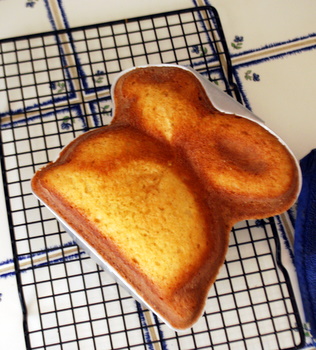
This pan is very easy to use. You simply grease and flour it, then fill it with batter (once you’ve got the amount nailed down) and you’re ready to go. I was concerned that I wouldn’t be able to check the cake for doneness, since you can’t see the cake as it bakes, but fortunately there is a small hole in the top of the pan to fit a toothpick or cake tester into and it works well. The cake bakes on its side, and it is easiest to handle if you set it on a baking sheet.
This cake recipe is tender, with a good vanilla flavor to it. It is a bit lighter than some pound cakes, more like a cross between a yellow cake and a pound cake. It’s still easy to handle as you’re decorating and quite sturdy. Use a wooden skewer or an extra long toothpick to test this cake for doneness, since a short toothpick will not get all the way to the center of the pan to see if it is cooked through.
Now, you can try other recipes in this pan, too. If you use a recipe that makes a big batch (say, a recipe that would ordinarily bake 2 dozen cupcakes), you can measure out the appropriate amount of batter for the bunny and bake the rest off as cupcakes. Choose a high-rising cake if at all possible to ensure that it will fill up the bunny. If you’re not sure, you’ll know you have enough batter when the bottom part of the bunny is almost completely filled up; this amount of batter will give you the best chance of having a complete bunny. And if you’re missing a tiny bit after baking – well, that is what frosting is for!
Vanilla 3D Bunny Cake Recipe
2 cups all purpose flour
1 tsp baking soda
1 tsp baking powder
1/3 tsp salt
1 1/2 cups sugar
1/2 cup butter, softened
1/4 cup vegetable oil
2 large eggs
1 large egg yolk
1 cup buttermilk
2 tsp vanilla extract
Preheat oven to 350F. Grease and flour the Wilton 3D Bunny Cake Pan.
In a medium bowl, whisk together flour, baking powder, baking soda and salt.
In a large bowl, cream together sugar and butter until light, then blend in vegetable oil, eggs and egg yolk. Add half of the flour mixture, followed by the buttermilk and vanilla, then stir in all remaining flour. There should be no streaks of dry ingredients remaining.
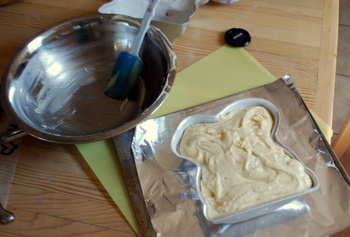
Pour into prepared pan (the side without the hole in the top!); batter should come almost all the way to the top of that half of the pan. Place 2nd half of the bunny on top and press gently to snap into place. Place bunny pan on a baking sheet.
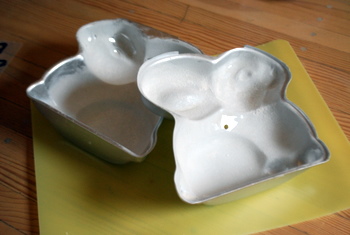
Bake for 55-60 minutes, until a long toothpick or cake tester inserted into the bunny through the hole in the top of the pan comes out clean (be sure to use a long tester or skewer!). Cool for about 20 minutes in pan, then open pan and transfer bunny to a wire rack to cool completely. I cooled the bunny on its side, using a paper towel to prop the head up, but you should be able to cool it upright, as well.
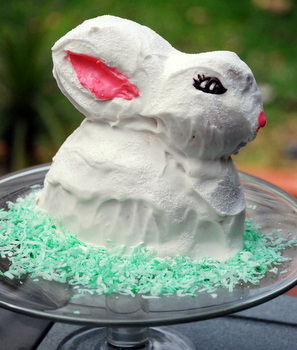
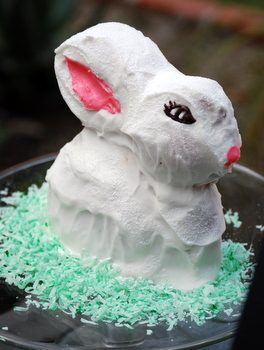
The decoration for this cake is up to you. I used white frosting topped with a little powdered sugar to give the bunny a “soft” look. I dyed a bit of the white frosting pink with some red food coloring and made a chocolate eye, although a jellybean or chocolate candy with a small chocolate dot added on for a pupil would have had a great effect, as well.


June
March 24, 2010I love the way you’ve decorated it.
Kat
March 24, 2010Adorable!
Jenn
March 24, 2010i like the green coconut (?) you used to surround it….how to cut it though??
Hope F.
March 24, 2010That is one cute bunny…
Carson
March 24, 2010Seems impossible to cut without making it fall over!
Julia
March 24, 2010That cake is incredibly cute! Do you think it would work with a less sturdy cake as well? I’m not really a big fan of pound cake. Angel cake maybe? Or will that make the bunny collapse?
minxi
March 24, 2010how did you make the chocolate eye lashes? very cute! 🙂
Emily
March 24, 2010Way Way Cute I love it. At our house my daughter would want me to use it for every cake!
Mysti
March 24, 2010wow, too cute!!
Katie
March 24, 2010How difficult was it to stand the cake up?
Shalane
March 24, 2010What a fun cake!
Michelle Cho
March 24, 2010This looks like it would really fun to decorate!
sevenmarie
March 24, 2010i think this pan is GENIUS! the whole reason i never get 3-d pans is because i cant imagine them working very well with being glued together with frosting!
Cakelaw
March 24, 2010Very cute!!
Jennifer
March 24, 2010this is so lovely and cute. I wanna try this. wow! yum.yum. 😉
Marcia
March 24, 2010Really, really cute!!
Natalia Rivera
March 24, 2010I’d love to try a Pullman loaf in this pan!
dani
March 25, 2010how cute!
Antonia
March 25, 2010So cute…love it!
Shannon
March 25, 2010Adorable little bunny!!!
Ann
March 25, 2010The bunny is way tooo cute to be eaten 😉
Karen
March 25, 2010This looks like a great uncomplicated recipe. Will try it with or without the bunny pan!
Katie
March 25, 2010Bunny is very cute and the cake recipe sounds delicious!
Kara
March 25, 2010Love the step by step and information for figuring out how much cake batter you’ll need. I would be lost without it!
Debbie
March 25, 2010Cute, and tasty I’m sure!
sdfarmers
March 25, 2010My kids would love this!
Wahoo
March 25, 2010It even looks cute without frosting!
Linda
March 25, 2010Great recipe and it looks great when you are done. I’m not much of a decorator but I could probably handle that and make it look great. I tried a 3-D pan for a friend (she bought the pan–I baked the cake!) that had the two pieces. First it was silicone so hard to manage and the wire racks had to be set crosswise on the rack to keep the legs from falling through the rack. I got burned several times on the metal holders trying to turn and handle the cake. This one is the smart way to go. Easier to manage in the oven and it looks wonderful! I told that friend to get one of these for the next 3-D cake we make!
Jenny
March 25, 2010Great job with the frosting. I find that’s the hardest part with the stand up cakes.
Daria
March 25, 2010Looks delicious….I’m curious though, do you eat the ears first like you would a chocolate bunny?.. 😉
Sara
March 27, 2010My kids are going to love this. They already love easter the way it is but I think that this cake will make it that much better. I am even excited.
Elisa
April 1, 2010My hero! I decided this was the year I’d be making a lamb-shaped cake, like the ones we had in my childhood. I bought the Wilton pan, and the lamb-shaped one comes with just as few instructions. But now I know what I’ll be baking inside it! Thanks! 🙂
Cheryl
April 14, 2010I am so glad i found this post I have been using the duck pan to so i can make my son a duck cake for his first birthday. I was following the back of the cake mix box and was not baking it long enough. Now that i have an idea of how much cake mix and approx baking time he can still have his duck. Thank you
Rachelle
April 29, 2010Thank you so much for posting this! Not only is your bunny absolutely adorable, but I’ve been searching for a good recipe to use in my 3-D pans, since box mixes basically don’t exist where I live =) This is just what I needed, and just in time for my daughter’s first birthday!!
برامج
May 22, 2010It’s extremely flavorful
Hong Tran
February 4, 2011I used your recipe to make this cake and it turned out perfect. I melted semisweet chocolate with butter and painted the entire rabit with chococate. He was very cute. Thanks for the inspiration.
Jennifer
January 7, 2012Thank you for the post! I previously made a 3D duck and found it raw on the inside even despite a long wooden stick test. I used this recipe and the duck was almost perfect. Either I stirred it too much or my baking soda/powder was too old, or I just needed a bit more batter to help this fill the entire mold as it baked. Next time it will work perfectly since I will double this recipe to fill the pan and have cupcakes too. Thank you for the help.