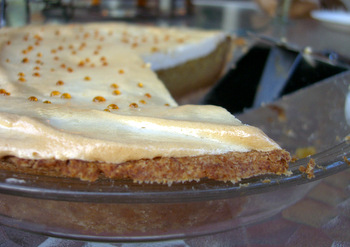
Many types of pies are topped with billowing meringues that give them a beautiful finished look and a lovely contrast between a denser filling and a lighter topping. But even though the meringues look good when you spoon them on top of a pie, they often start to weep and make your pie look less than perfect. Weeping is when a meringue releases droplets of liquid, giving the meringue the appearance of having tears or raindrops all over it – hence the name. Weeping is caused by an unstable meringue, one that is undercooked or that it simply has too much moisture in it.
Many pies are topped with a meringue made by beating sugar and egg whites together, spreading it onto a hot pie and baking it for a few minutes in the oven to brown it. This method generally sets the outside of the meringue and counts on the heat from the pie to help set it from below. Unfortunately, a few minutes in the oven isn’t really enough time to fully stabilize a meringue and meringues made in this way will often shrink, separate from the crust and start to weep after a short while.
There are a couple of solutions to the problem. One option is to extend the baking time slightly for your pies, giving the meringue more time to cook through. Another options is to add a stabilizer – such as cornstarch – to your meringue to help to absorb excess liquid. A tablespoon or so should be enough to help control the weeping initially, and it is easy to incorporate into a meringue. The stabilizer will help your meringue to last longer than one with nothing added, but once the pie is in a humid environment, such as the refrigerator (or your kitchen, if you live somewhere it is very humid), it may begin to weep anyway.
The most reliable way to prevent weeping is to replace a simple meringue with a very stable Italian Meringue. Italian meringue is made by beating egg whites until they reach soft, fluffy peaks, then slowly streaming in boiling sugar and beating the mixture until it is thick and glossy. The resulting meringue is fully cooked so it is very stable and it is significantly less likely to weep than an uncooked meringue (typically only in very humid conditions), and you can spread it on top of a pie and bake it until it browns in the oven without worrying about having an under-cooked meringue on your dessert.


Nancy @ gottagetbaked
April 19, 2013This post is so informative, Nicole. Thanks for sharing! I made a marshmallow frosting recently (egg whites heated with sugar and cream of tartar and then whipped). It was glorious when it was first finished whipping but an hour or so later, it was definitely weeping. I didn’t know what I did wrong but now I know that it wasn’t stabilized. I’ll definitely try an Italian meringue next time.
Judi
April 20, 2013I only recently discovered the different types of meringues… my favorite to date is the Swiss Meringue. SO delicious! Thanks for your informative post!!
Lynn
April 26, 2013Glad to come across your article, sometime ago I baked brazo de mercedes roll and was wondering why it was so moist the next day… I did put it in the fridge overnight.. So i thought it was just that.. Thank you for this info! I’ll try my recipe again with the italian meringue style and will see the difference 🙂
Treat Closet
August 26, 2014As a person who ADORES key lime pie with meringue topping, I have tinkered with this problem for years and have discovered many things through similar exasperating failures.
Meringue can be tricky, but there are a couple of great secrets: When you beat your egg whites, everything needs to be squeaky clean, no trace of oil, yolk, any kind of fat or they won’t fluff up fully. Cold eggs separate easily, room temp whites beat more easily. For 5 egg whites, add 2 Tbsp powdered egg white (“Just Whites”) to absorb excess moisture. Beat the whites with a large balloon whisk for greatest height. Beat until they barely start to froth up then add 1/2 tsp cream of tartar, a pinch of salt and a tsp of caster sugar (finely ground sugar.) You can grind your own in a coffee grinder as long as it is squeaky clean and free of coffee oils. The finer the sugar, the better it dissolves, avoiding those pesky undissolved beads of sweet liquid on top of your finished meringue pie. Adding these ingredients before you beat further prevents that awful separation of fluff and runny stuff that occurs when you overbeat whites. Now your mixture is stabilized and you can beat it like crazy and it won’t easily overbeat!!! Yay!
Now add the rest of your caster sugar one Tbsp at a time (I use 9 Tbsp in total) and ideally let it sit while you do other things, so the sugar is fully dissolved.
Prebake your pie crust 7 min at 325F and then add your lemon (or key lime) filling and bake that for 10 min so it’s hot before you spread your meringue on it. (Rebeat the meringue just before spreading for greatest height). You see, the runniness you’re experiencing is the uncooked white running down and sitting on top of the cold filling and never fully cooking. The hot filling prevents this from happening.
I like the cornstarch GEL trick (1 Tbsp cornstarch to 1/3 cup cold water, cooked till it loses its chalky taste and starts to look clear), and I add 1 Tbsp of it to my FILLING, and 1 Tbsp of it to a tiny amount of meringue in a separate bowl, get it really well-blended with no lumps, then spread that thinly over the hot filling. It seals the two layers that way, but doesn’t affect the texture/fluffiness of the finished meringue.
Bake the whole thing for 20 min. more, then turn off the oven and open the door 1/4 of the way and let it come down in temp. for 10 min. Remove from oven and then let it come to room temp, then refrigerate fully before slicing.
The ideal outcome is a silky textured flan-like filling and a high, non-shrinking white with a crisp crust. It might seep a little syrup after cutting and refrigerating a day or 2, but just fold a paper towel and place it in the pan to absorb this and your crust won’t get soggy.