Filed under Recipes, Pies, Pie and Tart Crusts by Nicole | 6 comments

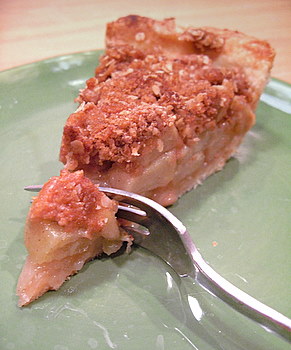
Crumble-topped apple pies used to be my absolute favorite type of pie. When I was a little kid, I was even known to ask servers in a restaurants whether their pies were crumble-topped or not, and base my dessert decisions entirely on their answers. This all came to an end around the time that I first had a traditional apple pie with a really great crust. Now, I would have to say that my favorite is a double-crust apple pie, although I still have a soft spot for crumble-toppings.
For some reason that I have never been able to figure out, apple crumble pies are often called French Apple Pies, though they seem to be more strongly reminiscent of homey cobblers and such than any french desserts I’ve had. The pies start off the same way a “regular” pie does, with a single layer of pie crust and a filling of apples, sugar and spices. This filling is not topped with another sheet of crust, but instead is topped with a generous layer of crumble mixture. Typically, it is made with a mix of butter, flour and sugar, but can range in texture from a a coffee-cake crumble topping to a crispy layer of oats and nuts.
My topping is of the crispier variety, as I like the texture that oats give to the crumble and the contrast it makes with the tender apples in the filling. I used Granny Smith apples for this pie, although I also like to use Jonagolds or a mixture of multiple types of apples for fillings for variety.
When it comes to crust, I prefer one made with a combination of butter and shortening (nonhydrogenated, of course) to one made with all one or the other because it turns out a crust with the perfect degree of flakiness and tenderness. All shortening crusts sometimes tend to be a little crumbly, while all butter crusts can get a little tough at times. But I’ll take all butter over all shortening any day, and that is exactly what I did here. I took care, however, when cutting the butter into the flour mixture, to leave some larger, pea-sized pieces of butter to keep the crust as light and flaky as possible. I added a bit of sugar to help brown the crust as it baked, too.
(more…)
Filed under Sweet Stuff, Baking by Nicole | 1 comment
The new October issue of Consumer Reports has all the details on a test that the magazine did of non-sugar sweeteners in baked goods, like cookies and cakes. Their test focused on low or reduced-calorie artificial sweeteners, and included Domino Pure D’Lite Sugar Blend, Splenda Sugar Blend for Baking, Splenda Brown Sugar Blend, Equal Granular and Estee Fructose. Fructose, which is the type of sugar found in honey and fruits, generally produced the best results with the best flavor, although it saved virtually no calories from the finished product when compared to real sugar. The artificial sweeteners all produced an aftertaste, to a degree, and preformed anywhere from acceptably (Splenda Brown Sugar in the Nestles Tollhouse Cookie recipe) to horribly (Equal Granular in cakes)
The magazine’s overall recommendation, after running their tests on 13 brands of sweeteners, is that if you want to bake with something other than sugar, it is a good idea to use a sugar blend, as those consistently produced better and tastier results than did artificial sweeteners alone. They note that if you want to avoid added sugar completely, you might be better off sticking to something that is naturally sweetened in the first place, such as fruit.
The entire report is worth a read if you are really interested in trying to bake without sugar, although there are natural alternatives that the magazine didn’t focus on. For instance, both Heidi and David have had good success using agave nectar. But the bottom line is that you’re probably not going to get the perfect chocolate chip cookie using that or any other non-sugar sweetener. With artificial or other non-sugar sweeteners is that if you want to use them, you have to be willing to experiment a little and you may have to compromise a little on taste or texture to put sugar content as your highest priority during baking, especially if you want to convert a recipe designed to be used with sugar into one that is made without it.
Filed under Product Reviews by Nicole | 5 comments
Regular readers will probably know by now that I love coffee (and coffee cakes, though that’s really a whole ‘nother issue). Not only do I drink quite a lot of coffee and incorporate it into recipes, but I also find it difficult to pass by a coffee-flavored candy without giving it a try. My most recent acquisition in this department was a bag of the Limited Edition Dark Chocolate Coffee Hershey’s Kisses. Hershey’s loves their special edition candies, so I wasn’t impressed with the “limited” run, but the flavor combination sounded promising to me.
The kisses are very dark and surprisingly bittersweet, with a coffee flavor that tastes very similar to that of reconstituted, freeze dried coffee. I don’t mean that to be an indictment of the quality of the candy - especially since I find that freeze dried coffee powder works so well as a flavoring in cakes and such - but that is the most accurate description of the flavor I can think of. The coffee aroma of the candy is good and the overall combination works well. That being said, I wouldn’t eat a whole bunch of these at once. I would much rather chop them up and add them to a cookie dough or cupcake batter, where the flavor can blend into something else and mellow slightly, while still adding a good coffee burst into the mix.
ETA: I see that Candy Addict found a bag of these earlier this year, although I haven’t personally seen them in stores until recently.
Filed under Gear and Gadgets by Nicole | 0 comments

I’m trying to resist a pun about being on a roll today, as I couldn’t resist mentioning yet another interesting rolling pin. The Roll & Store Pin is a rolling pin with removable handles and a clear, hollow center that can be used to store cookie cutters. The pin comes with a variety of round cutters, including a star, a bunny rabbit, a heart, a duck, a boy, a girl, a butterfly and a shamrock, that are shaped to fit the pin’s tube perfectly. This shouldn’t stop you from using the pin to store other types of cookie cutters (or other baking accessories) if you need to, of course, although larger cutters will still have to be stored elsewhere. The tube might also make a good storage space for a roll of cookie dough that needs to be chilled before you are able to actually roll it out. If you want to get the same cooling effect as the previously mentioned pin, you might try slipping some ice into the hollow tube before rolling, although the plastic does not have the same anti-condensation tendencies as the other pin does, which could be slightly problematic if you don’t work quickly.
The only real potential drawback to this pin is that it is made from plastic, so you might not be able to tackle some of the stiffer or heavier doughs that you could be working with. But cookie dough -especially soft butter cookie or sugar cookie doughs - should not give this type of pin any kind of problem, and since it is clearly designed to be a cookie pin, it shouldn’t be too much of an issue.
Filed under Gear and Gadgets by Nicole | 6 comments
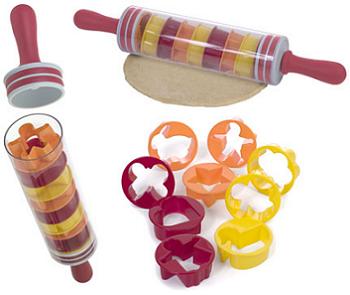
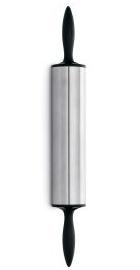
If I’m going to bake on a hot day, I’m probably going to choose to make something that isn’t particularly heat-sensitive. This means that pastries and other baked goods that involve cutting butter into a flour mixture and rolling out the dough are almost always out of the question; you have to work very quickly to keep the butter in the dough cool and solid while you work it. A tool I just discovered could change all this, however. The Chefs Catalogue has an ice water filled rolling pin for sale. The way it works is that one of the handles of the pin unscrews, revealing a chamber that can be filled with cold water. The coolness of the water will keep the condensation-free stainless steel body of the pin cold to the touch, chilling your dough at the same time that you are rolling it out and combating the heat in your kitchen.
Filed under Recipes, Puddings, Custards and Mousses, Chocolate by Nicole | 6 comments

Mousses are wonderful summertime desserts. They are light, require no (or minimal) cooking and can be stored in the refrigerator or freezer until ready to be served - and it is certainly hard to resist a cool dessert on a hot night. Chocolate mousse has to be one of the most popular mousses out there, and a rich, velvety chocolate mousse is the ideal dessert if you’re in the mood for something that isn’t heavy and won’t weigh you down after a meal, but is still ultra indulgent. Of course, in the face of how light chocolate mousse feels, we all know that they are generally chock full of melted chocolate and whipped cream, so the lightness of a mousse is definitely not in fat and calories.
Fortunately, there are ways to have a deliciously chocolaty mousse without all the unhealthy extras. This light chocolate mousse is just such a dessert and that makes it a much better option than a more traditional mousse for a summertime dessert in my book. Its light texture comes from meringue, rather than from whipped cream, and it is stabilized with gelatin. The gelatin is really easy to work with and this recipe is a great one to start with if your only previous gelatin experience is making boxed Jello (it goes without saying that the experienced gelatin handlers should not have a problem, either).
The mousse has a light, almost milk-chocolaty color, but is not too sweet and tastes more like cocoa than anything else. The flavor is not intense, but it comes through very well and would be an amazing backdrop for fresh summer berries. Once you’ve worked with the recipe, you might even want to play around by adding a few drops of mint or a splash of a favorite liqueur to the mixture before refrigerating it. I boosted the flavor in the finished dish by grating some dark chocolate over the top, using a zester to create a fine dusting. I also garnished mine with a few larger pieces of dark chocolate, although a sprig of mint or a few cookies would be a lovely accompaniment, as well.
(more…)