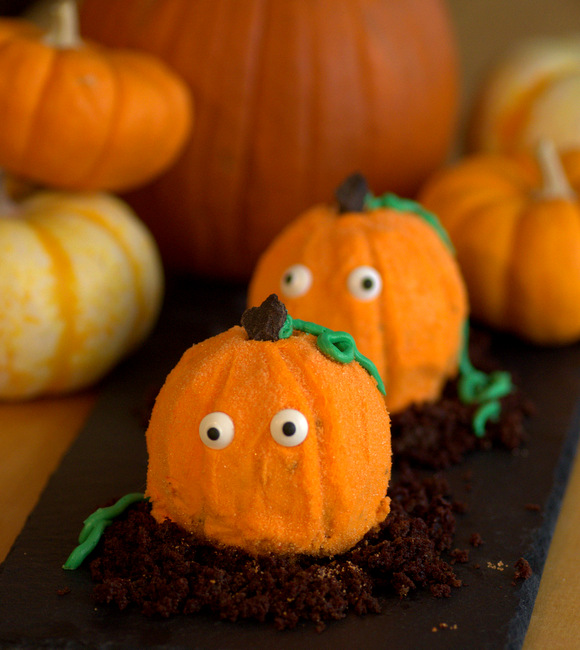
I have lots of mini pumpkins around my kitchen during the Halloween and Thanksgiving baking seasons. I always get a variety of sizes and, while I bake the larger sugar pumpkins, I generally use them as centerpieces and they show up as props in the background of lots of my seasonal pictures. These delicious Pumpkin Patch Cupcakes make a fantastic centerpiece, but they make an even better dessert because they are completely edible!
The cupcakes start out as chocolate cupcakes and turning them into pumpkins is surprisingly easy, though I should let you know in advance that you’re probably going to end up with some frosting on your fingers as you work. Decorating is slightly messy whenever you’re working on a round cake, but it is well worth a few sticky fingers!
In addition to the base chocolate cupcakes, you’re going to need a relatively big batch of buttercream frosting. The frosting not only covers the cake to give it a pumpkin shape, but a small portion of it is dyed green to pipe a vine (for a bit of color) on top of the finished pumpkins. When frosting cakes like these, it is better to have extra frosting than not enough. You can always make more if you run out, but I err on the side of caution and simply bake more cupcakes to use up leftovers.
The fun of these Pumpkin Patch Cupcakes is all in how they are put together. The lids are cut off the cupcakes and the stumps are sandwiched together with a bit of buttercream. The two-tier cakes are then shaped, with the help of a pairing knife, into a more rounded pumpkin shape by cutting off the sharp top and bottom edges. A crumb coat is applied and the cupcakes are chilled. The crumb coat will hold all the chocolate cake crumbs in place when you apply the final coat of frosting. Don’t skip the crumb coat because it makes decorating easier!
Once you apply the final coat of icing, drag the tip of a knife through the frosting to create vertical lines, giving the pumpkins a more realistic finished look. Chill again, then finish the icing by coating it with orange sanding sugar. This not only gives the pumpkins a slightly sparkly loo, but it makes them much easier to handle. Chocolate stumps are added to the top of the cakes, along with swirling green vines.
Don’t throw out your cake scraps when working on these cakes! They are used to make edible “dirt” to surround the cakes when it is time to serve them, finishing the pumpkin patch look. These pumpkins are made with chocolate cake batter, but you can actually use almost any cupcake recipe to make them. That said, chocolate cake or spice cake will give you the best look for your “dirt” crumbs.
If you do want to dress up your mini pumpkins for a spookier look, you have a couple of options. First, you could color a bit of buttercream with black icing and pipe on a jack o’ lantern face. Alternatively, you could poke mini chocolate chips into the pumpkin for an even easier face design. Finally, you could simply add on some candy eyes to give the pumpkins a little personality.

Pumpkin Patch Cupcakes
1/4 cup butter
2 oz dark chocolate (chocolate chips are fine), chopped
1/4 cup cocoa powder
1 cup sugar
1 large egg
1 tsp vanilla extract
1/3 cup buttermilk
1 cup all purpose flour
1 tsp baking soda
1/4 tsp salt
1/2 cup hot coffee (or hot water)
Frosting
1 cup butter, room temperature
3-4 cups confectioners’ sugar
3-4 tbsp milk
2 tsp vanilla extract
orange and green food coloring
1/2 cup orange sanding sugar
6 small chunks of chocolate (for the stems)
candy eyes (optional)
Make The Cupcakes
Preheat oven to 350F. Line a 12-cup muffin tin with paper liners.
In a small microwave-safe bowl, melt together butter and dark chocolate until smooth. Allow mixture to cool slightly.
In a large bowl, whisk together melted butter mixture, cocoa powder, sugar, egg, vanilla extract and buttermilk until smooth and well-combined. Add in flour, baking soda and salt and whisk to incorporate. Pour in hot coffee and whisk until batter is smooth. Divide evenly into prepared muffin cups.
Bake for 16-19 minutes, or until the cupcakes are set and a toothpick inserted into the center comes out clean.
Transfer to a wire rack to cool completely.
Make the Frosting
In a large bowl, beat butter until soft. Add in about half of the confectioners’ sugar, along with the milk and vanilla extract. Gradually blend in additional confectioners’ sugar until frosting is thick and smooth. Set aside a small portion of the frosting to be dyed green for the vines. Use orange food coloring (approx 1/4 – 1/2 tsp gel coloring or 1/2 – 3/4 tsp liquid food coloring) to dye the rest of the icing bright orange.
Assembly
Cut the tops off of two cupcakes and remove the wrappers. Place cupcake lids in a bowl for scraps.
Add a bit of frosting to the cut top of one cupcake and invert the second onto it, making an oblong cupcake. Using a paring knife, trim the top and bottom edges to round them off. Place trimmings into the scrap bowl. Repeat with remaining cupcakes to make 6 round cakes.
Carefully frost the round cakes with orange icing to make a crumb coat. Chill for 15 minutes.
Frost the cupcakes more generously to cover the crumb coat. If necessary, stick a skewer into the cupcake to hold it still while you frost. Use the tip of a knife to make ridges in the frosting and give it a more pumpkin-like shape. Chill for 20 minutes.
Coat pumpkins with sanding sugar, gently pressing it into the frosting and smoothing out any imperfections with your fingertips (chilling the cake should make them easy to handle).
Place a small piece of chocolate in the top of each cake to act as the stem, then pipe a swirl of green vine near the top for color. Add on candy eyes, if desired.
Take all the cake scraps and crumble them into small pieces. Make a pile of cake crumbs on a serving plate (or a small pile on each serving dish, if plating individually) and place the pumpkins on top of the “dirt” crumbs to serve.
Makes 6.


What do you think?