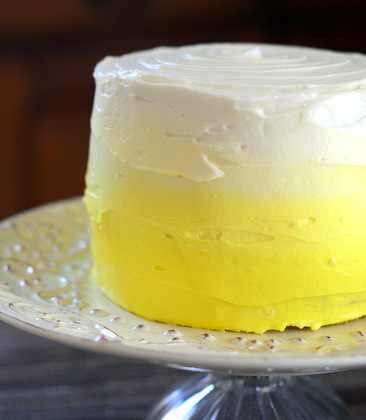
Ombré cakes are colorful cakes where the colors used are graduated from light to dark. Typically, this refers to the colors of the frosting on the outside of a cake, however the individual cake layers can also be colored to create a gradient. It’s a fun and easy frosting technique that anyone can learn to give your cakes a pretty and chic finish. Ombré cakes can come in any flavor, shape or size, but you generally want to work with a layer cake to get the look because it gives you a lot more surface area for frosting.
How to Make an Ombré Cake
To make an ombré cake, you need to start with a large quantity of plain white frosting and a baked, cooled cake. You can use homemade buttercream or store-bought frosting, but you should start with more than you think you’ll need (i.e. increase your homemade recipe by 25% unless you already know you will have extra, or pick up an extra can of frosting) because it is very helpful to having extra icing in case the colors aren’t quite right and you find you need to adjust them. I recommend starting with the darkest color of your gradient to ensure that you get the cleanest, most vibrant look on your finished cake.

First, transfer about a quarter of your icing into a clean bowl and add a generous amount of the food coloring of your choice. Here, I used yellow. Make this icing very vivid and leave the rest of the icing uncolored. Pipe (or spread) a thick stripe all around the base of your cake. Next, add in some of the white icing to your base color to lighten it up. Mix it well, then pipe a second stripe around the base of your cake, just above the darker color. Repeat the process until you have four or five different colors of icing, each progressively lighter in color, evenly spaced up the side of the cake. Â Finish your cake with either white icing or an extremely pale version of the base color.

To blend the colors, simply smooth the sides of the cake with an offset spatula until the colors run together and overlap slightly. This is what will give you a nice, smooth gradient effect. I like to use a small offset spatula to flatten out the initial stripes of color and push them closer together, then a larger offset spatula to smooth out the sides of the cake and finish off the look, as seen in the picture at the very top of this post. Most ombré cakes have a casual, handmade look to them, with swirls of icing here and there that really mark them as homemade. It’s a beautiful look no matter what colors you choose to work with and what occasion you’re preparing a cake for.


Sydney Sun
August 26, 2014This looks amazing! I’ve done ombre previously but with buttercream roses on the cake. Thanks for the step by step tutorial as well 🙂
Sydney
http://www.forloveofbaking.com