Making bread at home is very satisfying, and one of the most fun breads to make is pizza. Pizza dough can not only be turned into a filling meal, but it offers a hands-on experience where you can play with the dough to shape it and dress it with all your favorite toppings. Pizza dough is easy to make, but it isn’t easy to get right unless you have a very good recipe from an experienced pizza lover who is willing to take the time to show you how to do it right. Once you have the recipe and technique down, you’ll be ready to make pizza any time you’re in the mood for it.
One of the best places to start learning to make pizza is with Craftsy’ s free Perfect Pizza at Home class.  Craftsy is known for its wide variety of online crafting and cooking classes, and their free classes are the perfect way to learn a new skill, as well as to get a feel for their format before signing up for their other courses. The Perfect Pizza class is taught by master baker Peter Reinhart and covers all the basics that you need to make delicious pizzas in your own kitchen, whether you’re an experienced pizza baker or if you’ve never attempted making homemade pizza dough before. It covers several different dough recipes, sauce recipes and topping ideas, as well as giving detailed instructions on how to knead, shape and bake your dough. It also has a unit on making gluten free pizza dough for those who want to be able to indulge in pizza while avoiding wheat.
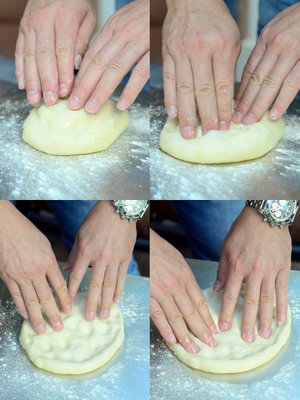
I make pizza at home on a regular basis and I’ve tried many different recipes, some better than others. I really liked the easy mixing technique that Reinhart used in the class and the tips that he gave – such as oiling your hands and working surface -to make handling the pizza dough easier, since it is a bit sticky at first and you don’t want to toughen it up too much. I used his American Style “Neapolitan” Pizza dough, which produces a slightly thicker crust than the classic Naples style dough. I chose to work with this dough not just because it is a good all purpose dough, but because I wanted to be generous with my toppings and needed a crust that was sturdy enough to support them.
The biggest problem I have when working with pizza dough is when I go to shape it. My pizzas often come out completely lopsided, or with dough that is unevenly thick throughout. The careful stretching techniques Reinhart demonstrated made the process much easier and I nailed the right thickness on every pizza I made.
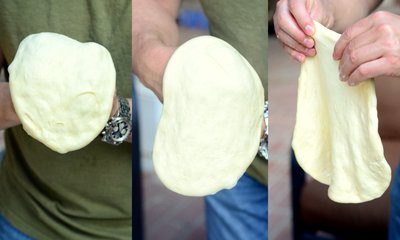
I will admit that my pizzas still didn’t turn out to be as round as I hoped, but shaping pizzas is one of those things that is much, much easier than it looks and it still takes practice even if you have a fantastic instructor helping you along with way. My pizzas were still much better shaped than they were before and I’m sure that I only need another batch of two of dough to get them into the right shape every time.
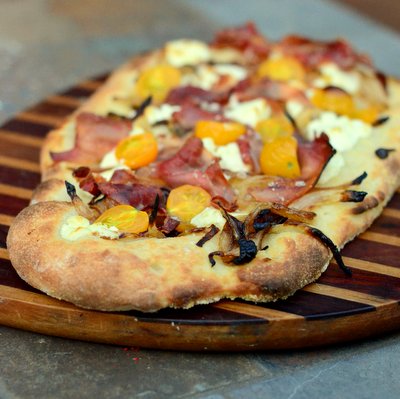
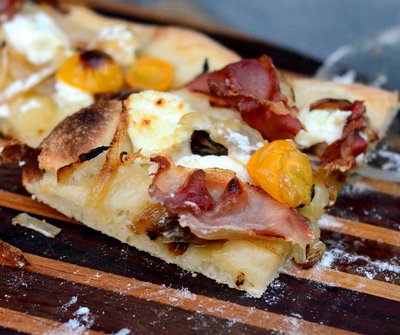
When it came to the toppings, I used some of my favorite ingredients: goat cheese, caramelized onions, prosciutto and tiny heirloom tomatoes from my garden. I didn’t use traditional pizza sauce because the ingredients are so flavorful on their own, and topped the pizza with a generous drizzle of olive oil before layering the other elements on top. The recipe below gives the amounts of each ingredient, but you can use more or less according to your tastes.
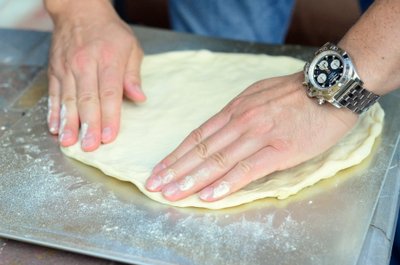
I baked my pizzas on a pizza stone, which is the best tool you can have in your kitchen if you want to bake great pizza. The stone absorbs heat from the oven as it preheats and when you place the uncooked dough directly on top of it, it allows the pizza to cook from the bottom as well as the top. This ensures that you will get a crispy bottom crust and an evenly baked pizza every time. Ideally, you need a pizza peel to slide your dough onto the stone in the oven, but since I don’t have a pizza peel, I used a flat, floured baking sheet and it works perfectly to get the job done without the need for too many extra gadgets in my kitchen.
The crust had a great flavor, an open crumb and just the right chewy texture. It held up well to my toppings in this pizza, and it is sturdy enough to layer with pizza sauce, mozzarella cheese and pepperoni for a more traditionally topped pizza, as well. The dough needs to be prepared in advance, and the unbaked dough can even be frozen for several weeks before using it, so you can mix up a big batch and keep it on hand for the next time you get the urge to whip up a perfect pizza at home.
Head on over to sign up for Craftsy’s free Perfect Pizza At Home Class before making this recipe. The step-by-step videos will show you all you need to know about mixing and working with the dough, and the days of deliver pizza will be long gone.Â
Prosciutto, Goat Cheese and Caramelized Onion Pizza
1 batch American Style “Neapolitan” Pizza dough
1 large onion, thinly sliced (about 1 1/2 cups)
1/2 cup good quality olive oil
12 oz goat cheese, crumbled or coarsely chopped
8-oz prosciutto
1 cup cherry tomatoes, halved
Follow directions for making American Style “Neapolitan” Pizza dough from Craftsy’s free Perfect Pizza at Home class. Allow prepared pizza dough to warm up to room temperature for 90 minutes before topping.
Preheat the oven to 550F – with your baking stone on the oven rack, if you have one.
In a large skillet with a small amount of olive oil, cook onions until caramelized and tender, about 15 minutes. Remove from heat and allow to cool
Divide dough into four portions. Working with one at a time, flatten the dough and shape into a 10-inch disc following the shaping directions from the class. Transfer dough to a pizza peel or large, flat baking sheet that is generously dusted with flour.
Brush dough generously with 2-3 tbsp olive oil and top with about 1/4 cup caramelized onions, 3-oz of crumbled goat cheese, 2 oz of prosciutto and about 1/4 cup of halved cherry tomatoes.
Slide pizza off of your peel onto your hot baking stone.
Bake for 6-9 minutes, until crust is golden brown and crisp.
Repeat with remaining dough portions.
Slice and serve immediately.
Makes 4 pizzas; Serves 8-10.
Disclosure: Baking Bites is a Craftsy partner and this post is sponsored by Craftsy. Any commentary given, photos taken and all opinions expressed are my own.Â


What do you think?