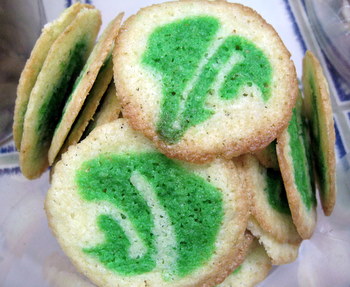
Brown Edge Butter Wafers are pretty much exactly what they sound like: thin cookies with brown edges and a white center. They’re not made with browned butter or anything unusual like that. The color around the edge actually comes from the caramelization of butter and sugar in the oven – and these cookies have quite a lot of butter in them.
The dough is very easy to make and takes only a few minutes to whip up. Once made, the dough should be either frozen or chilled until very firm before you work with it again; the high proportion of butter in the cookies makes the dough a bit tricky (it gets very, very soft) to work with when it is at room temperature. The dough should be formed into logs before freezing to make it a snap to slice off cookies and lay them out on a baking sheet when you are ready to go. The dough can also be kept in the freezer for up to a few weeks before use.
The finished wafers are thin and very buttery. The edges are a bit crisp, but the centers are deliciously chewy – and remain that way even after storage. Sweet but not too sweet, the cookies could easily be served with lemon curd or as an accompaniment to some other dessert (ice cream, etc.) if you feel they’re a bit too plain on their own. The color of the cookies’ edges are the best indicator of that they’re done during baking. Try not to let them get too dark in the oven, as they will continue to cook and firm up while they cool on the baking sheet.
The green design on the cookies is nothing more than colored dough that I swirled into the white dough. I’ve made spirals and checkerboard patterns with cookie dough before and for this batch I wanted to try my hand at doing something more interesting. By “interesting,” I mean “abstract” because the design clearly isn’t anything more than a green swirl. But there is nothing wrong with a swirl, especially when it turned out to make the cookies look quite festive. Feel free to play with your dough by mixing in a generous amount of food coloring to a portion of the main recipe, or simply leave the cookies plain for a simpler and more traditional look.
Brown Edge Butter Wafers
1 1/2 cups butter, room temperature
2 cups sugar
2 large eggs
2 tsp vanilla extract
1/8 tsp almond extract (optional)
2 cups all-purpose flour
1 tsp baking powder
1/2 tsp salt
In a large bowl, cream together butter and sugar until light and fluffy. Beat in eggs one at a time, followed by vanilla extract (and almond, if using). Mix in flour, baking powder and salt and stir until well-combined. If you want to add food coloring to the dough, divide it into halves or quarters and mix in liquid food coloring to achieve desired color.
Spoon dough (it will be soft) onto sheets of wax paper or saran wrap and shape into dics. Refrigerate for about 60 minutes.
Once dough has chilled, it can be shaped into logs and the colored doughs (if you opted for colors) can be wrapped together. Shape into 1 1/2 inch diameter logs, wrap in plastic wrap and freeze until very firm.
To bake, preheat oven to 375F. Line a baking sheet with parchment paper.
Slice cookies into just under 1/4-inch thick slices and place on prepared baking sheet, leaving 2 inches between cookies to allow for spread. Flour knife between slices for cleanest cuts.
Bake for 8-11 minutes, until cookies are golden at the edges. Cool on baking sheet for 10 minutes, then transfer to a wire rack to cool completely.
Store in an airtight container.
Makes about 5 dozen thin wafer cookies.


Susan
July 11, 2009I’m very late to the party (by way of the pecan slice’n bakes) but I just had to comment on this one. I adore brown edge wafers. They were my Mom’s favorite cookie so we had them frequently when I was a kid. I’ve thought of them often but especially when a recipe called for vanilla wafers knowing how much better it would be using these instead! Thanks for providing this recipe!
Tiffany Jewelry
April 9, 2010Very good!
lrm
December 7, 2010I used to make this as a kid…they were my great-aunt’s recipe, and instead of chilling [smart idea btw!], we would use a butter knife and a glass of water, and gently spread the cookie onto the sheet or paper-in swirls, until it formed a cookie circle…you have to rinse the knife alot b/c the dough is so soft and sticks…this method is time consuming, but what i love is how thin they are!
chilling and slicing things seems like it would work as well….
it’s that thin texture of a wafer, with the chewy and cripsy butter flavor, that is really amazing. thanks for this recipe-i had lost mine and no family to give it to me! (:
BJ
January 4, 2011I’ve been looking for a recipe since my mother-inlaw passed. These are delicous and bring back great memories. Thanks.