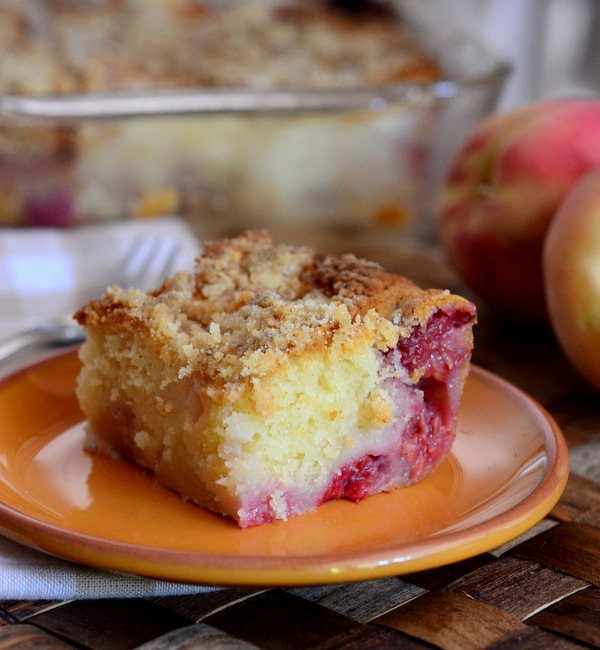
Nectarine Turnovers

Nectarine Turnovers

Turnovers are defined as small squares or circles of pastry dough that are filled with a sweet or savory filling, folded in half and pinched to seal, and then either baked or deep fried before serving. I guess I’m a bit narrow-minded when it comes to these pastries because, despite how broad the definition is, I can’t help but think of them as fruit-filled, single serving dessert pies. Fortunately, I like sweet turnovers very well and am perfectly content to continue to think of them this way, rather than wondering if I should start calling my empanadas “turnovers”.

Apple turnovers seem to be the most common variety of this pastry, largely because apple pies are so very popular. I opted not to use apples in mine, however, and to use some fresh and fragrant nectarines that I picked up at the store this week. Nectarines, as a stone fruit, are usually quite firm. This means that they can - and should - be prepared in much the same way as apples (or another firm fruit) would be for this recipe.

For the filling, the fruit is peeled and chopped into small, even cubes, then is cooked in a sugar syrup until the filling is thick and the fruit is tender. This thickening process is something that would normally take place inside the oven if you were cooking a whole pie, but the baking time for turnovers is much shorter and there simply isn’t enough time to ensure that your filling will get tender enough (without making the pastry soggy) during a short stay in the oven. You don’t want the filling to be too liquidy and risk that it will ooze out of the pastry cases during baking, so if your filling doesn’t thicken up enough on its own (this partially depends on the juciness of your nectarines), I’ve included a note about adding a bit of cornstarch to the fruit during cooking.

Any puff pastry will work fine for this recipe. I used a store-bought (”artisan”) puff pastry. When you go to work with it, make sure it has defrosted completely in the refrigerator and be sure to roll it out lightly before working with it. Don’t worry about rolling your pastry out to a specific size; work with whatever size or shape your pastry comes in. Turnovers should be quick, easy and casual desserts, so treat them as such.

You can prepare the filling in advance and chill in the refrigerator overnight. You can also fill and freeze the turnovers. If you opt to freeze them, freeze in a single-layer before storing in a freezer bag, and expect to add some additional time to the baking time.
(more…)

Apple Bourbon Bread Pudding

Apple Bourbon Bread Pudding

Apples are not the first fruit I think of to go into bread pudding. For some reason, things like cherries, raspberries and especially various dried fruits seem like more obvious choices to me, despite the popularity of the apple as a baking fruit. They are softer and, in the case of dried fruit, more absorbent. Both seem like better matches for a custardy and tender bread pudding than a crisp-tender baked apple. But I am not one to let minor culinary prejudices get in my way when I have an idea in my head and when the combination of bourbon and apples called to me, I decided to try them in a bread pudding together instead of going with a standby apple dessert, such as a cobbler, pie or crisp.

And I’m certainly glad I gave this particular dessert a try because it turned out better than I had hoped - and I think it converted me to someone who likes apple in bread pudding! The apples were lightly caramelized before being mixed into the custard and bread mixture that is the base of the pudding, which gave them a bit of extra time to soften up before the dessert went into the oven. The fruit ended up with that perfect crisp-tender texture that you want in a baking apple and added a nice contrast to the very soft bread pudding base.

Apple and bourbon always make a good combination - particularly when cinnamon, nutmeg and vanilla are also tossed into the mix - so the flavor of this dish was delicious. I used a fairly plain and soft white bread (store bought, sandwich-sliced potato bread, to be exact) and I did not bother to “stale” my bread, since I don’t find that doing so makes a big impact on the outcome of the pudding. The dessert will be slightly more indulgent if you use a butter and/or egg rich bread, like brioche or challah. Cinnamon swirl bread would be a pretty good choice, too.

Serve warm, either plain or with ice cream. If you want to take it really over the top, though, mix up a bit of the butterscotch sauce I made and spoon it on while hot. It’s not as thick as anything you’ll find at the ice cream parlor, but the flavor is great and it really makes this dish addictive. (more…)

Cranberry Apple Sauce

homemade cranberry apple sauce

 I recently found myself with an apple overload in my kitchen. This rarely happens to me since I tend to go through apples very quickly (eating them plain, in pies, in crumbles, etc.), so I decided to take advantage of the situation with a recipe that calls for quite a few apples: applesauce.

Applesauce is one of those foods that is so easy to make, everyone should do it at least once. And even if you’re not a fan of applesauce in general, I guarantee that it will taste better when it’s homemade than when it’s storebought. Part of the reason for this is that you’ll have a sense of accomplishment that you won’t find on a trip to the grocery store, but the main reason is that it is incredibly easy to customize applesauce to your own personal taste preferences.

For this batch, I used granny smith apples and fresh cranberries, and worked with guidelines I found here. Since both elements of the applesauce were on the tart side, I added a bit more sugar than I would have used for a sweeter apple to even out the flavor of the sauce. I also opted not to add any additional spices - cinnamon, allspice, nutmeg and cloves are all good additions to applesauce in general - to ensure that the cranberry flavor really shined.

The result was a delicious and incredibly beautiful looking applesauce. It tasted wonderful when it was hot and fresh off the stove, and is equally good cold. I’ll probably include this on my Thanksgiving menu this year. I didn’t bother to can the sauce because I will go through it fairly quickly, but you can certainly can it if you are so inclined; the recipe makes a big batch. (more…)

Apple Crisp

nic’s apple crisp

I always looked forward to eating apple crisp when I was little. Not only is it a tasty dessert, but it was a dessert that only my grandparents made, so I only got to have some when they came to dinner and brought a fresh batch with them. My strategy was to eat one serving when everyone else did, then snag any leftovers for myself later.  My grandma always told me that my grandfather made the crisp, that it was his special dessert. Years later, now that I have finally pried the recipe away from her and gotten a few tips on how they got it to come out so well, I found out that my grandfather’s role consisted of peeling the apples while my grandmother made the crisp.

In fairness, the dessert is so easy to make that peeling the apples is the most work-intensive part of the process. Once they are layered into the pan, they are topped with the “crisp” mixture. This particular topping is somewhere between a very, crispy crumbly topping and a biscuit-like one. The dough for it is too wet to roll it out, but not dry enough to just sprinkle it on. It must be broken up into pieces and arranged. It results in a topping that is pleasingly crispy on top and soft underneath, where it comes into contact with the apples. The flavor is very mild and cinnamon is sprinkled on top before baking, not mixed in with either the apples or the topping.

These days, my favorite way to enjoy this dish is a generous scoop served plain and still warm from the oven. My familiy likes to eat it warm with a scoop of vanilla ice cream. Leftovers should be stored in the fridge and the crisp tastes great even when chilled. When we had leftovers, we tended to eat them for breakfast, with a bit of warm milk poured over the top.

(more…)

Berry-Topped Pavlova

berried pav slice

If you like meringue, but you’ve never had a pavlova, you’re missing out. Pavlovasare sweet meringues that are baked until crisp on the outside and marshmallowy on the inside. There is some debated over when the recipe was first developed, and whether it was in Australia or New Zealand, but in either case, it has been around since approximately 1930 and is just as popular as it ever was. The meringue shell is typically very large - almost cake-sized - for a pavlova and the size helps give it its unique, cloud-like interior as it bakes. The size also allows plenty of room for whipped cream and other toppings to be piled on before serving.

Whipped cream is definitely the topping of choice for pavs. I know that some people - including myself on occasion - have mixed some whipped cream with sour cream or yogurt for a slightly thicker topping that is a bit lighter (in terms of calories) than straight whipped cream. Regardless of what type of whipped topping you decide to use, top it off with some berries.

Kiwis and strawberries are popular choices, but I used a mix of berries for mine. Raspberries, blueberries, blackberries and strawberries are all excellent. Fresh berries are the optimal choice, especially since fresh, ripe berries are still readily available at this time of year. If you can’t get them, however, frozen berries can work just as well. Defrost them completely before using and take advantage of the fact that they are often frozen with a bit of juice and drizzle a bit on top of the pavlova before serving for an extra splash of color.

The shell of the pavlova will crack easily under the pressure of a fork, but you should still be able to slice it and serve as you would a cake or a pie. If you want a smaller pav, try baking four smaller sizes with the recipe amount given below. They might be a bit crisper than their full-sized counterpart, but with whipped cream and berries to top them off, I highly doubt you’ll hear any complaints.
(more…)

Fresh Fruit and Cream Cheese Tart

strawberry tart

When you walk into a bakery, or even by the bakery section of the supermarket, what catches your eye? Is it the tray of perfectly decorated cupcakes? The seven-layer chocolate tortes? The piles of huge, perfectly-formed chocolate chip and shortbread cookies? Each and every option has its appeal (which is precisely why bakeries cleverly use clear cases to showcase their product), but I would put money on the fact that fresh fruit tarts will almost immediately grab you attention. When well-made, the tarts are a rainbow of colors glistening under a clear, satiny glaze. The fruit is almost always a mix of berries, kiwi and/or stone fruits, all of which look excellent on top of a creamy white background nestled in a shortbread crust.

This fruit tart is one of my favorites. It is easy to make and looks fantastic. When you serve it, people are just about guaranteed to ask you where you bought it because it is so elegant.

The tart has a shortbread-type crust, which can be made by hand or mixed up in the food processor. The crust is baked and cooled completely before being spread with a very thin layer of dark chocolate, which protects the crisp crust from becoming soggy after sitting with the filling in it (only a problem with leftovers, almost never an issue if the tart is made the day it is to be served). A sweet cream cheese filling is spread on top of the cooled chocolate layer and topped with fresh fruit and another drizzle of chocolate.

I tend not to measure things like chocolate and strawberries when I make this tart. For the chocolate, I simply melt some to coat the bottom of the crust, then remelt it (along with more, if necessary) to do the finishing drizzle. For the fruit, I always overbuy. This allows me to pick and choose the best looking berries, etc. for my topping and gives me plenty left over for munching while I work. It’s hard to go wrong with fresh fruit and chocolate, so keep in mind the fact that if you have both leftover, you can always indulge in a bit of chocolate fondue before serving the tart.

(more…)