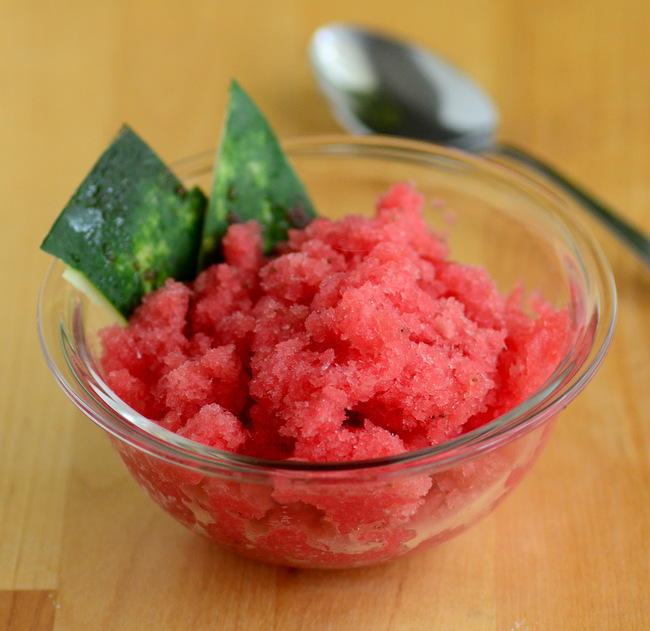
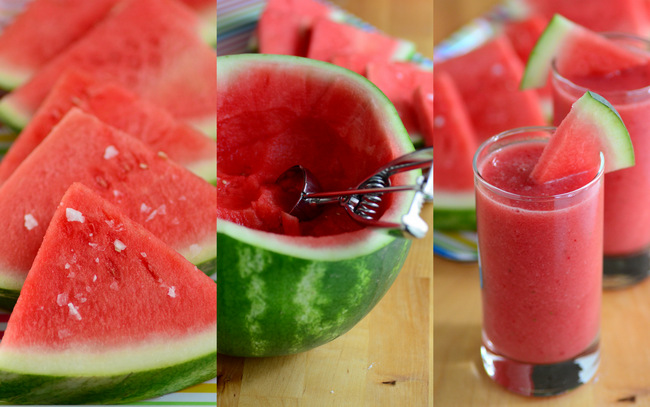
Filed under Sweet Stuff, Drinks, Fruits and Veggies by Nicole | 16 comments

The principle behind iced tea is simple: make hot tea and serve it cold. Unfortunately, getting a good batch of iced tea is not always as easy as it sounds. It’s easy to over-steep the tea, making it bitter, and it is equally easy to over dilute it with ice, leaving you with a less-than-refreshing drink. I find that the best way to make iced tea is to brew extra strong tea by using a few extra tea bags (depending on the size of the batch), stir in a generous amount of sugar or honey while the tea is hot, then chill it overnight without adding any ice. Ice should be added to the glasses just before serving.
My current favorite way to serve iced tea is to use frozen fruit in place of ice cubes. The frozen fruit keeps the drink cold while they are defrosting, and they don’t add excess water - unlike ice cubes - that dilutes the tea. In fact, they add a little bit of fruity sweetness to the tea, so each glass will be even more flavorful than it would be with ice alone. Frozen fruit will be good in any type of tea, but it’s even better if you brew a fruity tea to begin with. The tea pictured above is Zhena’s Gypsy Tea Strawberry Kiwi Green Tea (review here), which I iced with frozen strawberries, raspberries and cherries, then garnished with a sprig of mint.
Filed under Gear and Gadgets, Fruits and Veggies by Nicole | 4 comments

It’s always nice to have fresh herbs available in the kitchen. The most practical and economical way to deal with them is to grow them yourself, as you almost always end up with more than you need with store-bought, and the leftovers tend to go bad rather quickly. Herbs are some of the easiest things to grow - aside from weeds - but there will always be a few of us who just aren’t good at growing things. For the horticulturally impaired, the Power Plant Herb Garden is a tiny hydroponic growth chamber that will have your basil, mint and whatever else you want to plant growing in no time. The seeds are placed into the chamber with a nutrient-rich, but soil-less, growth sponge which provides them with exactly the right amount of water that they need to thrive, not to mention the vitamins that they need to be healthy.
These little gardens are also great for apartments and other places where there isn’t much space available. The tall, thin garden boxes fit neatly onto a windowsill, countertop or desk. As a bonus, you don’t have to worry about knocking them over and spilling soil and water all over the place because the containers are very stable - not to mention that they don’t actually use soil.
Filed under Sweet Stuff, Fruits and Veggies by Nicole | 13 comments

Blood oranges are a very unique-looking fruit. When you cut into an orange, you expect it to be, well, orange. Blood oranges are red inside, and can range from having a handful of red streaks inside to being so dark that they appear to be purple.
Blood oranges have been cultivated for centuries, primarily in Sicily, Italy, and are grown in many Mediterranean countries. The oranges were introduced to the US in the 1930s and are grown in much of the Southwestern US, from California to Texas. The season lasts from November to May, with the peak coming between December and March. There are a few varieties of blood orange. Moro are the darkest blood oranges, and have the sweetest flavor, with berry tones. Sanginello is of medium sweetness with a medium amount of color, and is from Spain. Tarocco is the most popular variety on Italy and is considered to be the sweetest of the blood oranges. Type aside, as a general rule all blood oranges are quite sweet - sweeter than many regular varieties of orange - and have floral notes to them.
If you see a recipe that calls for blood oranges, you can easily substitute regular (non-blood) oranges or orange juice in that recipe. You might end up missing out on some of the lovely pink color that blood oranges can infuse, but the recipe will work just fine.
Filed under Fruits and Veggies by Nicole | 8 comments

Meyer lemons get more popular every year, and what was a relatively unknown fruit just a few years ago can now be found on restaurant menus, in mainstream supermarkets and food/home magazines. Meyer lemons aren’t lemons; they’re actually a hybrid between a mandarin orange and a lemon. The cross was originally developed in China, where both types of citrus fruit occur naturally. The fruit was brought into the US in the early 1900s by a man named Frank Meyer, after whom the lemons are named.
Meyer lemons are generally smaller than regular lemons, with a spherical shape and a thin peel. They tend to be more of a golden color than a bright yellow. Since Meyers are a hybrid, they have a different flavor than standard lemons. They are slightly sweeter and much less acidic. They still taste like lemons, of course, they just don’t have the same zesty bite to them. They’re more expensive than regular lemons, but tend to be very juicy.
I should also note that although most Meyer lemons will fit in with this description, not all of them will. I am lucky enough to have a small Meyer lemon tree (note that it can be cheaper to keep a small tree in a yard or a large pot than buying Meyer lemons when they’re in season) and my lemons are huge. They’re easily three times the size of the lemons I see in stores and they have a fairly thick rind, although the Meyer lemon flavor is spot-on.
Meyer lemons are a good choice for most recipes that call for lemon because you can get a full lemon flavor without having to add excess sugar (or other ingredients) to temper the acidity of the lemon. They’re great in desserts and all kinds of baked goods, and work wonderfully in savory dishes where you don’t want lemon to overwhelm the rest of the meal. That being said, they’re not the greatest choice for lemon recipes where you really want that extra acidity - like lemonade, for instance.
Filed under Sweet Stuff, Savory Snacks, Dips and Sauces, Fruits and Veggies by Nicole | 9 comments

There are two things that you should definitely try during the summer, when temperatures are high and you don’t really feel like cooking: baking cookies in your car and making homemade raisins. The former requires an 100F-or hotter day to work well. The latter simply requires a very warm sunny day, fresh grapes and patience.
Homemade raisins are easy to make and the finished product is well worth the effort. Raisins are formed when most of the water contained in a grape evaporates, leaving behind a slightly shriveled fruit that has a very high sugar content. They can take up to several days to dry out and go from “juicy grape” to “plump raisin,” and as long as you check on them once in a while, it is virtually impossible to over-dry them. Homemade grapes will almost always be more flavorful and sweeter than commercially produced raisins (although I’ve had some good ones at the farmers market before) because they’re fresher and still have enough of their natural moisture to keep them tender.
To make raisins, start with a bunch of fresh grapes. Rinse them well, and put them in a single layer on a flat surface. I use paper towel-lined baking racks, partially for cleanliness and primarily to increase the circulation of air to the fruit. Then, place the grapes out in full sunlight on a hot day and wait for the sun to do its work. I like to put a fine screen on top of the grapes to deter flies from approaching as they dry. The process will take about 4-6 days, depending on the weather and the sun exposure. Feel free to take the raisins inside at night, then put them out again in the morning.
Filed under Gear and Gadgets, Fruits and Veggies by Nicole | 5 comments
There are many types of fruit and sometimes it seems like there are almost as many ways to peel them. Bananas, oranges and grapefruits, for instance, are all very self-explanatory fruits that require little more than a tug at the skin to remove it. Other fruits pose more of a challenge. If you’re just going to eat a piece of fruit, the skin might not be a big deal, but if you’re going to bake with it, sometimes the skin just has to go.
For hard and (relatively) dry fruits, a sharp knife will do the job quickly and easily. Apples and pears can often be skinned this way before going into a pie or tart. For softer and more delicate fruits, the traditional method of peeling is to cut a shallow cross in the bottom of the fruit and then blanch them in boiling water for a minute. This loosens the skin and, when you run the fruit until cold water, it usually comes right off. The downside to this method is that it can be a bit time consuming with all the steps involves - boiling water, prepping fruit, removing skins, drying fruit - and it’s hard to get up that kind of energy when you only need to peel a peach or two.
As I mentioned before, a plain vegetable peeler will work for some fruits, but they’re not the best choice for all fruits. Fortunately, many companies make serrated fruit peelers specifically for getting the thin skins off fruit without damaging the flesh beneath and these can work wonders. The serrated peelers have less “drag” when cutting the fruit, so they get cleaner cuts than regular peelers and do minimal, if any, damage to the flesh of the fruit. I have an OXO serrated peeler that works very well. Peeling is definitely faster than the blanching method - unless you’re making many pies at once and need a few dozen nectarines all at once. Then, I’d use the blanching method and a big pot.