
In my last update on my kitchen renovation, I documented the demolition of the out-of-date and seriously dirty kitchen in my new place. Pulling out those old cabinets made it look better than I had seen it – but a kitchen without cabinets, appliances and countertops isn’t that much use in the long run and I wanted to get the new stuff in there!
Why I Went With IKEA
I decided early on in my kitchen planning process that I would go with IKEA for my kitchen cabinets. Â This decision was made for a several reasons:
- Price: Not only are IKEA kitchens very reasonably priced, they have sales 1-2 times per year where you can get an additional 20% off your entire kitchen order. That sale includes everything from appliances to the trays that you use to organize your silverware in the drawer – and once you’ve placed an order, you can go back to IKEA and get that same discount on other kitchen accessories, even after the original sale is over. I was able to order my kitchen on sale and that extra savings paid for my countertop and my refrigerator. Score!

- Design: IKEA puts a lot of thought into their products and that means that you get some bonus features that you would pay a lot more for with other companies. For instance, every door and drawer in my kitchen as quiet-close hinges. It also means that you have both classic and very contemporary options to choose. In my experience, some of the more modern kitchen options at other stores (anything beyond a very basic kitchen look) came with a big price increase, where the difference at IKEA for a much more expensive look was quite a bit smaller. (Click above image to enlarge for sample kitchen designs.)
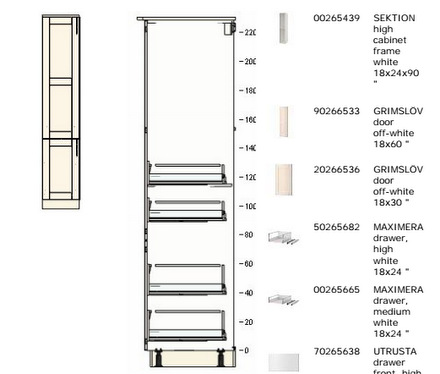
- Warranty: IKEA’s SEKTION kitchen comes with a 25 year warranty that covers every single part of the cabinets, doors and trim in the kitchen. If a piece of your kitchen doesn’t hold up over time for some reason, they’ll replace it and that means your kitchen will almost always look perfect (except for dirty dishes, of course!). Their appliances, which are made by Whirlpool, also come with a 5 year warranty.
- Installation: IKEA contracts with local contractors who will install your kitchen for you. The quote I got from the local guys was extremely reasonable and their timeline was very quick. You can also install your IKEA kitchen yourself. If you’ve ever assembled a dresser, desk or other piece of furniture from IKEA, you are qualified to put the cabinets together and you can save a lot of additional money on your overall renovation by DIY-ing the kitchen. I opted for the DIY option because I wanted to be hands-on in my project, though the pros could have had the whole thing done in two days and it took me a bit longer than that.
I got quotes from several contractors/outside kitchen planners about kitchens at various other price points (some costing as much as four times the IKEA kitchen). While several of them tried to talk me out of IKEA when I revealed that I was considering using their cabinets, others had had positive experiences with the IKEA kitchens and thought it was a very reasonable option for my space. At the end of the day, I couldn’t find better prices with the look I wanted, nor a better warranty offer. If money were no object, I might have gone for something higher end, but I got the look I wanted at a price that was just about unbeatable and that made me very happy!
The Design
Once I decided on IKEA, I simply had to plan out the details. Of course, that started with a trip to the store to see everything in person and to eat some meatballs. I love walking through demo kitchens and being able to touch all the finishes. Online, IKEA has a 3D kitchen planning tool that allows you to put in the dimensions of your space and map out the cabinets you want. It’s fun to play around with (other stores offer similar online tools) and watch the kitchen come together, but it takes some time to get the hang of it. IKEA offers two types of additional kitchen planning help: a measuring service, which will confirm all the measurements of your kitchen so that you can better use the 3D planning app yourself, and a personal kitchen planner, where a personal planner comes to your home, measures and maps out the new kitchen for you.
The better option for me was to use the services of a real, human IKEA kitchen planner, who spent a couple of hours going over all the options and finishes, and mapped out every detail of the kitchen for me. She knew where we might need additional parts (fully returnable, if not used), what bonus features were nice to have and what the most commonly asked for features were. She had planned dozens of kitchens, if not more, and was able to put things together much more quickly than I would have been able to on my own. At the end of the planning appointment, I had detailed drawings of what the kitchen layout would look like and lists of every part required to put it together.
The experience of the kitchen planner really came in handy when it came to picking out extras for the kitchen. IKEA has all kinds of hidden drawers and sliding shelves that you can tuck into your kitchen. Since I was starting from scratch, I spent a lot of time focusing on the big picture and overall layout. The designer was able to point out many space-saving features and help ensure that the new kitchen would have a place for everything I needed in it.
I ordered my kitchen well before demo was complete. Fortunately, I was able to schedule delivery of my kitchen more than two months out, so I had plenty of time to the space ready to go. I happen to live very close to an IKEA and delivery was quite inexpensive, especially considering that the delivery guys brought every item inside and carefully cataloged each piece to make sure I wasn’t missing anything.
What I Changed in My New Kitchen Layout
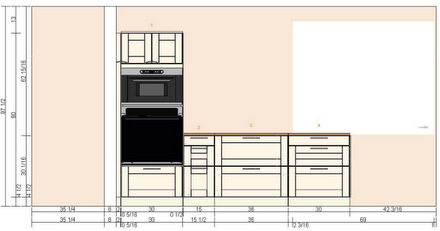
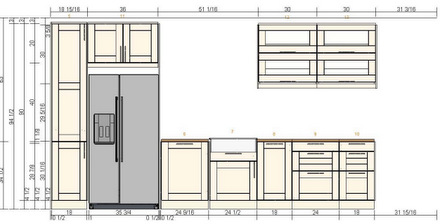
My kitchen is a relatively narrow galley-style kitchen, though having a patio door at one end gives it a particularly open feel. As I planned the layout, I wanted to achieve a couple of things: I wanted it to be as open and airy as possible, have as much counter space as possible and have a reasonable amount of storage. The counter space issue was particularly important, as the original kitchen had almost no counterspace.

The overall layout of my new kitchen is the same as the old kitchen, with a few improvements. There is a gas wall oven in the same location as before and my gas cooktop moved over a few inches. Since I punched through a wall where there was previously a large and useless pass-thru (with no cabinets underneath) to make a walkway, I was able to add 30 linear inches of counter space on one wall of the kitchen next to the cooktop and install a small breakfast bar(not pictured). On the opposite wall, I added about 24 linear inches of additional counterspace after removing an inconveniently located built-in that limited the length of the kitchen counter (see Renovation Part 1 for pre-demo photos). That is 10 square feet of extra space for rolling out pie dough and taking blog photos!
To make the kitchen airier, I removed a sofit on the sink wall, allowing my pantry and upper cabinets to go up an additional 12-inches. I purposely kept the upper cabinets to a minimum – though I still have plenty of room for all my glassware and plates – to keep the kitchen feeling bright. Galley-style kitchens can feel claustrophobic if you fill all the available space with cabinetry. I also opted for glass-front upper cabinets to help open the space, though that isn’t clear in the sketch above.
With my plans in hand, I ordered my kitchen and tore out the old one. In the next post, I’ll talk about the details of the kitchen and my DIY experience installing the SEKTION kitchen.
In case you’ve missed out on the story so far:Â


Sarah H
February 12, 2016So excited to see all this! We went with Ikea for our galley kitchen reno. Now I wish we’d used the planner, as I think that would have been great to have. We also bought the old Akurum line, which I’m regretting now, because I think it would be nice to have the option to go get more add on things. But I’m still really happy with it a year later.
Nicole
February 12, 2016Sarah – That’s great! One advantage to the older line is that there is a lot of info out there on how to put it together, neat “hacks” you can do and other tips/tricks. With the new line, there is a lot less of that. It came out in Europe before it did here and I definitely watched a few YouTube videos in Swedish when I had assembly questions.
benny
March 2, 2016Okay, looking good!
David
April 21, 2016Thanks for this informative post. It’s very important to document everything before starting this procedure.
Foodiewife
April 29, 2018Okay, so now you leave me hanging… how did it turn out? I am dreaming of a new kitchen myself.