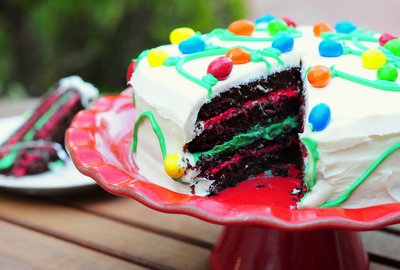
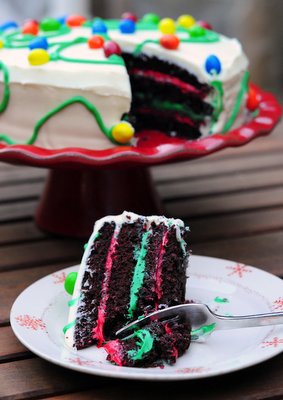
I love chocolate and peppermint around the holidays, and juding by the number of Peppermint Mochas and Peppermint Bark that I see in coffee shops and stores, almost everyone likes to see this combination this time of year, as well. Instead of making another batch of peppermint bark to showcase these two flavors, I decided to make something a little bit more dramatic looking this year: a Holiday Chocolate Peppermint Layer Cake. This festive cake has four layers of chocolate cake that are sandwiched together with a colorful peppermint buttercream.
For the cake, I used a chocolate “wacky cake” that I regularly use for layer cakes. It’s called a wacky cake because it is made without eggs. It is moist and has a very good chocolate flavor, but the fact that it is very easy to make is what keeps me coming back to it. The cake is also sturdy enough to stack into layers easily without the individual layers cracking, which makes it an extremely good for making very thin cake layers, as I did here.
I baked the cake in four 9-inch pans to create relatively thin cake layers. Baking the cakes individually also means that they will have a very short baking and cooling time, so you can get the whole cake together a lot faster. If you don’t have four 9-inch pans, you have two options for baking the cake layers. One thing you can do is bake the cakes in batches, baking two thin cakes at a time and then prepping the pans for a second use once the first layers are baked. This cake batter can sit at room temperature while you work in batches. Alternatively, you can also bake two thicker layers (baking time given  below) and cut them in half with a serrated knife to get the same 4-layer effect for the finished cake.
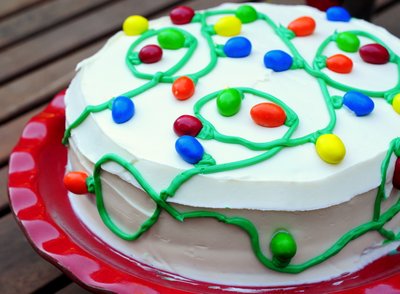
The peppermint frosting is a simple buttercream. I colored a portion of the frosting red and green to add some holiday color to the inside of the cake, but you could keep it simply white for a more subdued look. Garnish the cake with peppermints, sprinkles or go all-out with holiday decorations and add a festive string of edible Christmas lights (read the tutorial here!) to the top to finish it off before serving.
Holiday Chocolate Peppermint Layer Cake
Chocolate Cake
3 cups unbleached all-purpose flour
2 cups sugar
1/2 cup unsweetened cocoa
2 tsp baking soda
1 tsp salt
2 tsp vanilla extract
1 1/2 tbsp vinegar
1/2 cup vegetable oil
2 cups cold water
Preheat the oven to 350F. Grease four 9-inch round cake pans, line with circles of parchment paper, and grease again.
In a large mixing bowl, sift together flour, sugar, cocoa, baking soda and salt.
In a small bowl, whisk together vanilla, vinegar, vegetable oil and water. Pour into flour mixture and whisk until batter is smooth and no streaks of dry ingredients remain. Divide evenly into prepared pans.
Bake for 10-14 minutes, or until a toothpick inserted into the center comes out clean.
(Cakes can also be baked in two 9-inch pans for approximately 25-30 minutes, then cooled and cut in half with a serrated knife.)
Cool in pans on wire racks for 15 minutes. Turn cakes out of pans onto a plate (or another rack), remove parchment paper, and reinvert onto racks to cool completely before frosting.
If storing overnight before frosting (they can be made a day ahead), wrap completely in plastic wrap and keep at room temperature.
Peppermint Frosting
1 1/2 cups butter, room temperature
1/4 cup milk
2 tsp vanilla extract
1 tsp peppermint extract
5-6 cups confectioners’ sugar
red food coloring
green food coloring
In a large bowl, beat butter until softened. Beat in milk, vanilla extract, peppermint extract. Gradually blend in confectioners’ sugar until frosting is thick and spreadable.
Transfer heaping 1 cup of frosting to a small bowl. Add approx 1/2 tsp red food coloring (1/4 tsp gel food coloring) and beat until color of frosting is bright red and uniform.
Transfer another heaping 1/2 cup of frosting to a second small bowl. Add approx 1/3 tsp green food coloring (1/4 tsp gel food coloring) and beat until color of frosting is bright green and uniform.
Assembly
Place one layer of cake on a serving platter or cake stand. Spread with half of the red frosting, creating an even layer.
Place second layer of cake on top of the red frosting. Spread with the green frosting, creating an even layer.
Place third layer of cake on top of the green frosting and spread with remaining red frosting. Top with final layer of cake.
Spread a very thin coat of white frosting over the top and sides of the cake to create a crumb coat. Refrigerate cake for 20 minutes.
Spread remaining white frosting over the top and sides of the cake. Decorate as desired.
Serves 16.


What do you think?