Bread baking is perceived as being a very time-consuming and tricky process, with yeast, flour, proofing and shaping to contend with. This is why the concept of low-maintenance “no-knead” bread is so appealing. I tend to think that bread making only seems time consuming because of the long rises, not the few minutes of kneading dough, but I’m always up for a recipe that is easy and produces a great-tasting result and “no-knead” bread fits that bill perfectly.
To make no-knead bread, you basically only need to mix up the dough, give it a long, slow rise, and bake it without any kneading or shaping necessary. The long slow rise allows both gluten and flavor to develop, so that you end up with a bread that tastes good and also rises up well. The dough can be wetter than a dough that needs to be handled, which means that you’re also able to get a loaf that has a thick, crunchy crust and a moist, chewy interior. No-knead breads are usually baked in some sort of lidded pot or dutch oven (and are sometimes called “Pot Bread” as a result). This enclosed space helps the crust to develop and shapes the bread so you don’t have to.
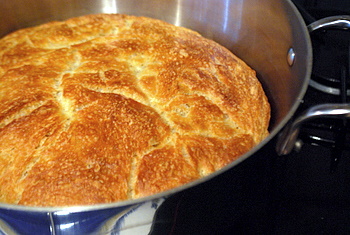
This loaf is based on a Nancy Baggett recipe and is definitely as easy as promised. It had a great flavor, with a nice butteriness and a very subtle tang from the long first rise. It also had a wonderfully chewy interior and an excellent crust. My bread rose well and had a nice, open texture. You can substitute bread flour for the all purpose in this recipe, but you will still get very good results with the all purpose (all purpose is what I buy in bulk – and what most people keep in their kitchens – so it is definitely a little more convenient).
The shape of your bread will vary slightly depending on the size pot you use to bake it in. I used my Dutch oven, but if you don’t have a suitable pot already, you might want to check out Nancy’s advice on picking a good one for bread baking.

No-Knead White Bread
4 cups all purpose flour
2 tbsp sugar
2 tsp salt
3/4 tsp instant yeast
1 3â„4 cups + 2 tbsp ice water
2 tbsp butter, melted and cooled
In a large bowl, stir together flour, sugar, salt, yeast and ice water until well combined. Dough should be thick and slightly sticky. Add a few tablespoons more flour if dough is too soft; add a bit more water if it is too dry and the flour is not incorporating well. Brush top of dough with some vegetable oil to prevent sticking, then cover with plastic wrap and let stand at room temperature for 12-18 hours.
Pour melted butter into risen dough and stir vigorously, until well incorporated. Cover bowl again and let dough rise for 2 – 2 1/2 hours.
Preheat oven to 450F. Place a dutch oven inside for about 20 minutes, until both it and the oven are hot.
Remove dutch oven from oven and, working carefully, pour bread dough into the dutch oven, trying to deflate it as little as possible. Sprinkle with water and put the lid on the oven.
Lower oven temperature to 425F. Bake bread for 50 minutes with the lid on. Check the bread to see if it is browning. If not, remove the lid at this point. Bake for an additional 20 minutes. Check the bread with an instant-read thermometer and when it has reached about 207F it is done.
Turn bread out onto a wire rack to cool before slicing.
Makes 1 large loaf


Brent
April 30, 2009Do you find the finished bread to be a bit “wet” on the interior? I made the Leahy version a couple of times, but I never could seem to create a dry but tender crumb.
Healthy Diet Lets Woman Lose Thirty Pounds in Thirty Days
April 30, 2009Hi, interesting post. I have been thinking about this issue,so thanks for sharing. I will definitely be subscribing to your site.
howtoeatacupcake
May 1, 2009I just bought “Kneadlessly Simple!” This bread looks GREAT!
Elyse
May 2, 2009I’m loving this no-knead bread!! I can’t wait to try it out. Not only does it sound easy, but the results look totally delicious!
Vbulletin Temaları
June 13, 2009I very like it.Now ı eating it
Oyun ve Program Ä°ndir
August 17, 2009🙂 i very like it
Seks Ä°zle
August 17, 2009MMmmamamia. Thanx !
watch anime online
April 14, 2010white bread is good and healthy
kral oyun
April 19, 2010i like it
youtube
April 19, 2010thanx really good
firma rehberi
April 19, 2010interesting post thank you
jenesuispasunestart-up
May 5, 2010great post.. yummmyy
unique educational toys
May 12, 2010bread looks delicious