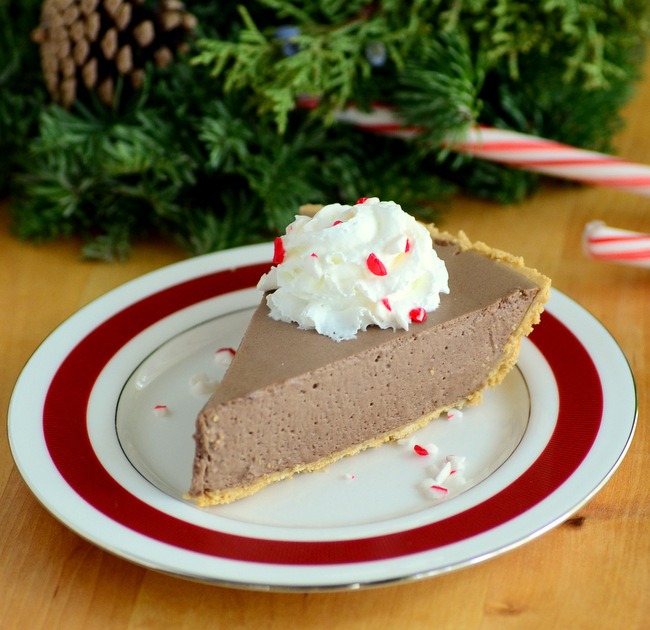
The combination of rich chocolate and cool peppermint is a good one in just about any form, whether you’re sipping a mug of peppermint-spiked hot chocolate loaded up with marshmallows or indulging in a slice of this Chocolate Peppermint Chiffon Pie. This pie is a great make-ahead dessert for entertaining, not only because it is easy to put together, but because it has a combination of flavors and textures that you and your guests will absolutely love.
Chiffon pies have mousse-like fillings that don’t require any baking because they are set with gelatin. While some of you might picture firm, brightly colored cubes of Jello when talking about gelatin, it can help set a mousse to the perfect consistency when used well. In the case of this recipe, the pie filling is creamy and almost seems to melt in your mouth, with a light and airy texture that is still firm enough to slice through.
This filling starts out with a pudding-like base that is made with egg yolks, milk and plenty of chocolate. Any dark chocolate – I prefer one around 60-65% cacao myself – will work well in this filling. Once the base is prepared, gelatin is added and it is allowed to cool. Next, an egg white meringue and a generous amount of whipped cream are folded in to give the filling its final, airy texture. The egg white meringue does not have to be cooked if you are comfortable serving your pie that way, but it can also be cooked to eliminate any concerns about food safety. I’ve included directions for a cooked meringue below.
The crust not only provides a nice vehicle for serving the chiffon, but it adds a crisp contrasting texture to the creamy filling. Graham cracker crusts are a good choice and are widely available if you don’t want to make your own. A chocolate crumb crust can also be used, as can a no-bake crust. If you do opt for store-bought crusts, you may be able to fill two with this mixture, as they tend to be on the shallower side. If you are making a homemade crust in a deeper pie plate, this should generously fill one crust. All that said, as much as I like this as a pie, it would make an nice dessert if you simply wanted to pour it into cups and let it set, skipping the crust entirely.
The filling should be left to set up for at least 4-6 hours, and I generally leave it overnight. When you’re ready to serve it, slice it with a sharp knife and top each piece with a dollop of whipped cream and a sprinkle of finely crushed peppermint candies or candy canes.
Chocolate Peppermint Chiffon Pie
3 large eggs, divided
2/3 cup sugar, divided
1 1/4 cups milk, divided
2 1/2 tsp gelatin powder (1 envelope/.25 oz)
4 oz chopped dark chocolate (approx. 1/2 cup)
1 tsp peppermint extract
1/2 tsp vanilla extract
1/4 tsp salt
3/4 cup heavy cream
1 9-inch graham cracker pie crust
In a medium bowl, combine egg yolks, 1/3 cup sugar and 1 cup milk. Whisk until well-combined.
In a small bowl, combine 1/4 cup milk and gelatin. Allow the gelatin to soften for 5 minutes.
Transfer egg yolk mixture to a small saucepan and add in chopped chocolate. Bring to a simmer, stirring constantly until the chocolate has melted. Remove from heat immediately when you see bubbles. Add in softened gelatin and stir until it has completely melted. Whisk in peppermint extract, vanilla extract and salt. Transfer mixture to a shallow bowl, and refrigerate for 20-30 minutes, until it has cooled to about room temperature. Stir to ensure it cools evenly.
When filling has cooled, combine egg whites and remaining 1/3 cup sugar in the bowl of a double boiler. Bring the lower portion of the double boiler to a simmer and beat egg whites to stiff peaks, about 4-5 minutes. (If you are ok with uncooked egg whites, this can be done without a double boiler). Fold egg whites into chocolate mixture.
Beat heavy cream to stiff peaks. Fold heavy cream into chocolate mixture.
Pour chocolate chiffon mixture into prepared pie crust and refrigerate for at least 4-6 hours, or ovenight, until firm. Serve with whipped cream and finely chopped peppermint candies.
Makes 1 pie (2 pies, if your crusts are on the shallow side)


Natalie
December 21, 2017This pie looks so good and silky smooth!