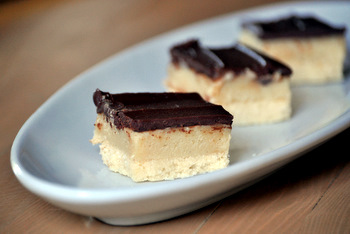
Millionaire’s Shortbread is a three-layered dessert, with a shortbread base, a caramel center and a chocolate topping. The bars are popular in the UK and in Canada, but are not as well known here in the US. This is something that I’d like to change because these very tasty bars are delicious and well worth every bit of effort that goes into putting them together (and they’re easier to make than they look!).
The shortbread crust is made with butter, brown sugar, flour and salt. It is pressed into a large baking pan and baked until golden brown and crisp. After the crust has cooled, a caramel layer that uses a lot of sweetened condensed milk and butter is prepared and poured on top. The caramel layer definitely has a buttery, caramel flavor to it, but it is a thick, tender layer and is slightly reminiscent of vanilla pudding because of all the condensed milk in it, rather than straight caramel. This layer is also cooled before adding the final layer of chocolate.
My Millionaire’s Shortbread is a little different from most that I’ve seen because I like to use chocolate ganache instead of using straight melted chocolate to top the bars. Straight melted chocolate ends up being a little crisper as a top layer, but I think that a richer ganache blends a bit better with the sweetened condensed milk filling. It is also much easier to slice through, and you don’t need to worry about tempering it to keep your bars looking beautiful.
These bars are good when served at room temperature but are also quite good cold. I definitely recommend storing them, covered, in the fridge on a warm day or when you simply want them to last a little bit longer.
Millionaire’s Shortbread
Shortbread Layer
2 cups all purpose flour
1/2 cup brown sugar
1/2 tsp salt
3/4 cup butter, chilled and cut into pieces
Caramel Layer
1/2 cup butter, room temperature
1/2 cup brown sugar
1/4 tsp salt
2 15-oz cans sweetened condensed milk
1 tsp vanilla extract
Chocolate Layer
10-oz dark or bittersweet chocolate, chopped
4 tbsp butter, room temperature
Preheat the oven to 350F. Line a 9×13 inch baking pan with aluminum foil or parchment paper and lightly grease.
Make the shortbread layer: In the bowl of a food processor, combine flour, sugar, salt and butter. Pulse mixture together until mixture takes on a sandy consistency and the butter is well-incorporated. This can also be done by hand, rubbing the butter in with your fingertips.
Transfer mixture to prepared pan, spread evenly and press into a firm layer.
Bake for 35 minutes, until light golden brown.
Allow to cool completely.
Make the caramel layer: In a medium saucepan, combine butter, brown sugar, salt and sweetened condensed milk. Cook over medium heat, stirring constantly (making sure to scrape the bottom and sides of the pan), until caramel comes to a boil.
Reduce heat to medium-low and, still stirring constantly, cook for 4-5 minute, until caramel thickens. Remove from heat and stir in vanilla.
Pour caramel onto cooled shortbread crust and spread into an even layer.
Allow to cool completely.
Make the chocolate layer: In a double boiler, melt together dark chocolate and butter, stirring until mixture is very smooth. This can also be done in a microwave-safe bowl using the microwave on 50% power, checking at regular intervals to monitor the melting chocolate.
Pour onto caramel and spread into an even layer with a spatula.
Allow to cool completely.
Once all layers are assembled, the bars can be sliced with a sharp knife and served.
Makes 36 bars (depending on how large you slice them)


sue @ Cakeballs, cookies and more
January 6, 2012I agree the plain chocolate would be hard. They sound great.
Amanda @ Once Upon a Recipe
January 6, 2012Love these! My mom makes them every Christmas but we just call them Caramel Squares. Delicious! They freeze well too!
Renu
January 6, 2012Nice recipe, would definitely try this. I love your blog for the baking tips, apart from the delicious recipes you share.
Kenni
January 7, 2012These sound so good, but if I made these I would just eat the whole pan in one sitting!
Linda
January 8, 2012I made these for my librarians and delivered them yesterday when I visited. Very easy recipe. I hope they all feel like millionaires when they eat them–good way to start the new year.
I made the right before I went to bed to let the caramel layer set up overnight. I noticed the house smelled of warm caramel as I readied for bed. Made for sweet dreams and a good night’s sleep. I plan on making these again. With a minor flour substitute they would easily become a GF dessert.
Yatee
January 8, 2012This looks like the perfect thing to make either for at home or to bring, because they do look and sound pretty fancy.
Yatee
January 8, 2012This looks like the perfect thing to make either for at home or to bring to a party, because they do look and sound pretty fancy.
Bakeware
January 9, 2012I think I’m going to make these for my SuperBowl Party!
The Food Hunter
January 9, 2012My husband is going to be very happy.
Jamie
January 10, 2012My Nana used to make these all the time. she called them Caramel Slice I guess they were cheap and easy to make. You certainly wouldn’t know fro m the taste – they where simply ‘heavenly’.
Joanne
January 12, 2012Will be making these this weekend. Cannot wait!
Thanks!
Danie @ Sist3rs.net
January 17, 2012Our grandmother always had a pan of these squares in her kitchen cabinet. Every time I take a bite, it makes me think of her and the love she put into everything she baked.
Fuji
January 29, 2013This is actually one of my fave recipes. I’ve tried it several times but I couldn’t manage to get it perfect. I always make a mess when I cut the bars and my caramel always melt. I live in a tropical country so it is a factor but I would at least want them to stay intact for at least an hour until I can bring them someplace. How do I manage to keep the middle layer from not melting and any tips on how i can cut them more neatly? Yours really look nice and firm. Thanks