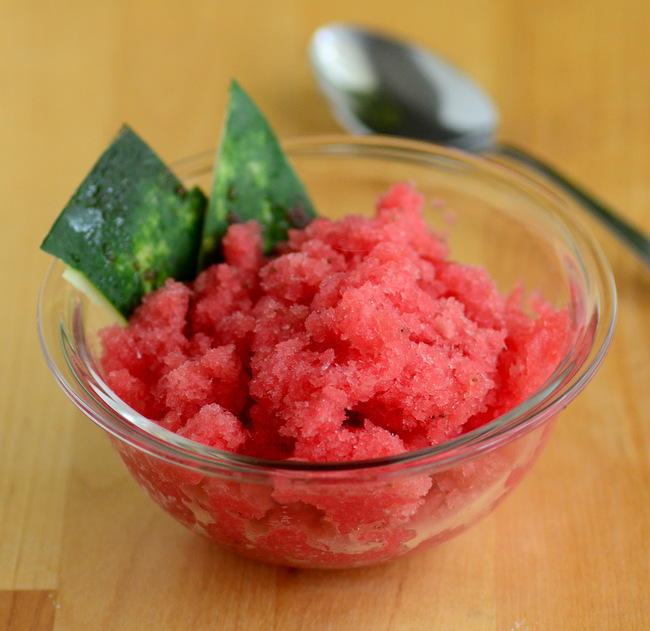
Archive for the ‘Frozen Desserts’ Category

The Mint Julep is the official drink of the Kentucky Derby. The Derby is of the most famous horse races in the country and it is run the first weekend in May every year. Although not everyone is a horse racing fan, some of the traditions associated with Derby Day are so much fun that it is easy to get into the spirit of things. One tradition is for ladies to dress up and wear huge, fun hats to the track. The other, of course, is to drink Mint Juleps.
A Mint Julep is a cocktail made with boubon, mint, sugar and crushed ice that has been served at Churchill Downs during the Kentucky Derby. They’re tasty and refreshing, and the flavors in the drink translate very well to other applications – like this Mint Julep Sorbet. The sorbet, like the drink, is made with sugar, bourbon and mint. I added a little bit of heavy cream to give it an extra creamy texture and to take the edge off the bourbon. The finished sorbet is light and even more refreshing than the cocktail that inspired it, with a bright mint flavor and a hint of bourbon.
I made this sorbet in my Blendtec blender, which actually has an ice cream setting on it. The ice cream setting is just a very, very high speed and you should be able to get the same (or similar) results with other blenders, although you might end up with some fine bits of ice in some models that aren’t as powerful. You could also do the same in a food processor. The sorbet is easy to scoop right out of the blender, but putting in the freezer for a couple of hours will firm it up a bit more and take it from soft serve to scoopable.
+Continue Reading

Olive oil is a great match for citrus, because it often has zesty notes in it that are similar to the zesty flavors in citrus – although olive oil isn’t quite as sweet as an orange usually is. I like baking with it, and it goes particularly well in recipes where there is already a citrus element, like my Orange Olive Oil Muffins. It can also work in even more unexpected places, as it does in this Tangerine and Olive Oil Sorbet.
The sorbet is primarily made with fresh tangerine juice, with a little lemon juice added in to add a hint of tartness to the sweet orange juice. The sugar is just right to balance the sorbet without masking the orange flavor (and the frozen sorbet will taste less sweet than the unfrozen base does). A little bit of olive oil gives the sorbet a slightly grown-up note to it – although it is subtle, so don’t be nervous that your sorbet will taste like cold olive oil! The olive oil also serves to keep the sorbet creamy and scoopable. Many sorbets are icy, and turn out more like granita when you try to scoop them out of the freezer. That little bit of fat that comes from the olive oil helps to give this sorbet a very smooth texture.
You can easily make this sorbet with other types of oranges instead of tangerines. Blood oranges, for instance, would be a great option. Freshly squeezed juice is will always give you the best flavor. As with all ice creams, you are going to get the best results if you make this sorbet in an ice cream maker. If you don’t have one, you can still make it by pouring the mixture into a shallow dish and placing it in the freezer, then stirring it every 30-45 minutes with a fork until it freezes. This method won’t give you as smooth a finished product, but it will still be delicious.
+Continue Reading

If you love maple syrup, you really should make this Maple Syrup Ice Cream. It is ice cream made with pure maple syrup, instead of sugar, and it delivers a lot of maple flavor in a cold, creamy base. Surprisingly, it isn’t too sweet to eat by the scoopful and I often enjoy it that way. It is even better when served alongside a slice of homemade pie, a fruit cobbler or some shortbread cookies – anything you might ordinarily pair with plain vanilla ice cream. Getting a small bite of maple ice cream in each bite of pie will turn an ordinary pie into something very memorable.
The ice cream starts with a french ice cream base, where hot milk is used to temper eggs to create a nice custard base. The eggs add a nice richness to the ice cream without making it too eggy. This ice cream also uses only whole milk and no heavy cream, as I found that too much cream took away from the maple syrup a bit. You will need to use an ice cream maker for the best results with this recipe.
AS a final note, I know that maple syrup is a pricey ingredient. It is definitely necessary to use the real thing in this recipe, not pancake syrup or a blend. I also recommend opting for a dark maple syrup, or grade B maple syrup, instead of a light syrup or grade A (even if it is labeled “extra fancy”), so that you get the best flavor in the ice cream. It is even better if you have a little bit of syrup left over so that you can drizzle a little bit over the ice cream when you serve it.
+Continue Reading

This is an ice cream for peanut butter lovers. Peanut Butter Cup Ice Cream is a rich peanut butter ice cream that has a swirl of chocolate shavings running through it, delivering a great chocolate-peanut butter flavor with creamy ice cream and a slight crunch from the chocolate. It is addictive – and might be even more addictive than the peanut butter cup candies that inspired this flavor combination.
The ice cream starts out with an easy to make peanut butter base. Use a peanut butter that you like the flavor of for this recipe, because you are really going to taste it in the finished product. I used an all natural national brand (Jif All Natural) that I frequently use for baking. There are no eggs in the ice cream base because the peanut butter adds a lot of thickness to the mixture, and plenty of fat to keep the finished ice cream ultra-smooth and scoopable. I also used honey as the sweetener here because it goes so well with peanut butter, and it is easy to whisk in to the no-cook ice cream base.
I churned the peanut butter ice cream in my ice cream maker (and yes, you will want an ice cream maker for the best results with this recipe), then added in the chocolate. Ice cream churned in an ice cream maker typically needs to be frozen after churning to fully firm up, and transferring it from the machine to a storage container is the perfect time to add any mix-ins to a batch of homemade ice cream.
I didn’t want to use chocolate chips in this ice cream because I don’t like big, hard chunks of frozen chocolate in my ice cream (standard chocolate chips are just too big). So instead, I shaved a bunch of milk chocolate into chocolate curls, then layered those very thin pieces of chocolate with the ice cream as I scooped it out of the ice cream maker and into a freezer-safe container to firm up. I used a lot of chocolate shavings in between the layers of ice cream, and the result was not only a great peanut butter and chocolate combination, but also a beautiful chocolate swirl in my ice cream. I used milk chocolate, but you can use milk or dark. I think that shaving the chocolate into rough curls is a fast and easy way to break the chocolate down into small pieces and they have a great texture, but finely chopping the chocolate is an alternative that will work here, too.
+Continue Reading

The creamsicles I ate as a kid were orange-flavored popsicles filled with a vanilla ice cream. When you bit into the popsicle, you got a nice blend of orange and cream that is what everyone associates with a creamsicle. These popsicles are ones that I rarely buy these days, but I also rarely make them at home, even though I make other popsicles regularly. They are difficult to make at home because, even with fancy popsicle makers, it can be tricky to get that ice cream filling into a popsicle shell. After a little experimentation, I came up with a compromise that captured the flavor of a creamsicle in an easier to make format.
My Orange Yogurt Creamsicles are two-layer popsicles. One layer of the pop is fresh orange juice, and the other is a combination of juice and yogurt. Although the ice cream in a creamsicle is typically vanilla, I found I got a great creamy element to the popsicles with plain yogurt instead, and the popsicles still had a very zesty and refreshing orange flavor. I filled the molds partly with orange juice and let it partially freeze, then added the yogurt layer on top to get the two-tone effect. The orange layer doesn’t need to be completely frozen, just frozen enough to hold its shape while the second layer is added.
For the orange juice layer, I prefer to use just plain, freshly squeezed juice. The orange juice sets up a little bit icier than the yogurt mixture, and has a tart-sweet taste to it. I like the contrast, personally, but you can decrease the iciness and up the sweetness by adding a tablespoon or two of confectioners’ sugar to the plain orange juice for that layer if you prefer. Either way, this flavor combination will bring back memories of those classic pops – even if the format is slightly different this time around!
+Continue Reading