
Tempered chocolate is very glossy, has a firm finish and melts smoothly at around body temperature. Simply melting the chocolate before you use it to dip berries, truffles or other goodies does not temper it. The process of tempering involves raising and lowering the temperature of the chocolate to encourage strong, organized crystallization of the cocoa butter so that the finished chocolate will have that glossy look, a sharp snap and will be resistant to chocolate bloom. In short, tempering chocolate makes it last longer and look better, and if you are serious about using chocolate in your kitchen, it is good to know how to do it.
There are several ways to temper chocolate and this method is known as seeding. It is very simple and it is very easy to do at home, both with small and large quantities of chocolate. For this demonstration, I am working with dark chocolate. Milk and white chocolates also need to be tempered and can be tempered in the exact same way as this dark chocolate, but the tempering process happens at a slightly lower temperature.


Start with your chocolate in small pieces. These are sold by chocolate makers and often called pistoles, callets or wafers, but you can also take a large bar of chocolate and coarsely chop it into smaller pieces. Small pieces of chocolate melt more easily than large pieces and make tempering much easier. Larger quantities of chocolate are easier to temper than smaller ones, so I recommend working with at least a pound of chocolate to make your life easier (you can always let the extra set and remelt it later as needed), especially when you are starting out.
Remove 25-30% of your chocolate and set it aside in a small bowl. This is known as the seed and you will use it later.

Put the rest of your chocolate in a microwave-safe bowl and cook on high heat in 30 second intervals until the chocolate starts to melt. You can melt chocolate over a waterbath, but I prefer a microwave in this case. A small amount of water can cause your chocolate to seize and working without condensation is a little bit safer. Once it starts to melt, heat the chocolate in 10-20 second intervals, stirring in between, until it has fully melted. Dark chocolate needs to reach a temperature of between 114-120F. Milk and white chocolate need to reach a temperature between 105-113.

Check the temperature of your chocolate with a digital probe thermometer or with an infrared thermometer (which I am using). If using an infrared thermometer, be aware that it only takes the surface temperature, so you should stir the chocolate as you check it with the gun.

Now that the chocolate has been melted, it must be cooled. With the seeding method, this is done by adding in the unmelted chocolate that we set aside at the beginning of the process. Add in the seed (25-30% of the initial weight of the chocolate) and stir with a spatula. The pieces of chocolate will start to melt and, after a few minutes of stirring, should have almost (but not quite) melted completely. Check the temperature of your chocolate after a few minutes. Dark chocolate needs to be between 88-91F. Milk and white chocolate need to be between 84-87F. Continue to stir until your chocolate as reached this temperature.

This temperature is known as the “working temperature” and your chocolate should be tempered at this point. To test it, dip a small strip of parchment paper (1 or 2-in piece is large enough) into the chocolate. Set it aside and allow it to set up. It should set in about 2 minutes and should be glossy, not streaked, if it has been tempered properly. The longer it sits, the firmer it will become. Well-tempered chocolate will also retract (pull away from) the paper after a while.

Your tempered chocolate is ready to use for dipping or enrobing. The working temperature should be maintained as long as you work with the chocolate, so it should be occasionally warmed in the microwave or using a heat gun (if you want to get serious about your chocolate work).
Common Problems:
- If the chocolate does not set up in 2-3 minutes and looks streaky, it may be undertempered and did not cool enough to allow the cocoa butter to crystallize properly. Add a small amount of finely chopped chocolate and continue to stir the chocolate. Re-test.
- If the chocolate sets up in less than 2 minutes, it may be overtempered. Heat the chocolate (in short bursts in the microwave) until it warms up slightly and stir until it is more fluid. Re-test and add more heat if necessary.
- Practice makes perfect and chocolate can be tempered, melted and re-tempered over and over again.
Working with chocolate can be a lot of fun and learning to temper chocolate can really take your desserts to a new level, whether you want to add a glossy chocolate coating to a batch of homemade shortbread cookies, dip the bottoms of biscotti or dress up some fresh strawberries. That said, it is also important to keep in mind that chocolate does not need to be tempered for baking and cooking applications. When you are making chocolate ganache, for instance, or simply need some melted chocolate for a batch of brownies, there is no need to try and temper it before you use it.


Maureen
February 3, 2012Working with chocolate always makes me nervous so I always put it into things. It’s been years since I’ve tempered chocolate.
You make it sound so simple so I’ll follow your directions. Thanks for posting this.
Betsy
February 3, 2012I needed this! I’ve had many a chocolate FAIL in my kitchen. You’re the best resource as always!
rainey
February 3, 2012I think the day I finally successfully tempered some chocolate was the *most* satisfying day I spent in a kitchen ever.
I enrobed marshmallow and I kept a piece for perhaps 6 months just to see if it would really, really, really stay in temper. It did. ::major grin::
Camille
April 18, 2012I just tempered chocolate for the first time last night and I think I pulled it off! The only thing I am a little uncertain of is the exact look of the chocolate AFTER it dries. I dipped some candied lemon slices and after about five minutes the chocolate was firm (which is a good thing) but the shine of the chocolate was gone. It is smooth and snaps perfectly but the once shiny chocolate is rather dull…..what should I do differently? Or is this the way it’s supposed to look? I read one article that states the only way to get shiny chocolate is to use a mold…is that true?
Nicole
April 18, 2012Camille – Congrats on your success! It sounds like it went well. It is true that the chocolate will get the shiniest finish when it is made in a mold (polycarbonate with a smooth finish is what most candy makers use) because chocolate takes on the properties of whatever it’s touching when it hardens. For instance, if you make your chocolates on a textured sheet (like a silpat), it will have a dimpled finish on the bottom.
The chocolate on candied lemon slices, or other dipped items, will have a little bit more of a matte finish but it will still be much smoother and shinier (and last much longer) than untempered chocolate will.
Jenn
September 30, 2012what kind of chocolate should I use for tempering? I’ve read that you DON’T use chips. But I can’t find what TO use. I’ve looked in my area for blocks/chunks of chocolate but can’t find anywhere that sells them like that. Is a bar of Baker’s chocolate useable? Or a Hershey’s bar? I need to make some turtles and cherries soon and am at a loss for what to use.
Nicole
October 1, 2012Jenn – You can absolutely use chocolate chips to temper chocolate. Any real chocolate – and by “real” chocolate I mean chocolate that has real cocoa butter in it, and no vegetable oil/fat – can be tempered. Chocolate chips are fine, and a bar of Baker’s chocolate should be just fine, too.
Amelie
November 12, 2012I’ve been looking for a while for clear and simple explanations for chocolate tempering and your post is just so amazing. Thank you!
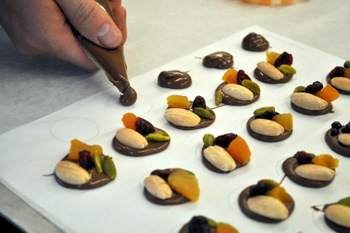
I still have a few questions: Is this possible that if I’m adding elements like nuts, sea salts, dried fruit on top of my tempered chocolate, can it affect the look of it? I’ve noticed so far lighter circles creating after 2-3 days around the elements that I added. Was it because the chocolate was not tempered properly ? Thank you!
Juliana
December 10, 2012Hey Nicole! Great post!
I have a question. What can I do with the chocolate if I try to temper it without a thermometer and I don’t succeed? Meaning that when I make the parchment paper test, it doesn’t harden, so it was tempered properly.
Can I re-heat it and try once more? (again, without a candy thermometer) How should I do that?
Or is it just better to use it for other purposes and start again with a new chocolate bar?
I actually have a thermometer but one of my friends asked me this and I wasn’t sure if she could start again from that melted, untempered chocolate.
Thanks again!
Nicole
December 10, 2012Juliana – Good question. If the chocolate doesn’t harden at all (or takes a VERY long time), that means that your chocolate got a little too hot while you were working with it. You can simply add in some more coarsely chopped (unmelted) chocolate and stir it in, which will help cool it down and bring it into tempering range.
Depending on how much chocolate you are working with, you’ll want to add in about 20% more solid chocolate than you have already melted. As you stir it in, you may find that the chocolate is thickening a lot and not all the new pieces are melting (They should melt in very slowly – if they melt in very fast, add more solid chocolate). IF this is the case, you can pop the bowl into the microwave for 8-10 seconds to help warm it slightly. Then re-check the temper.
I hope that helps!
I’m hoping to make a video of this soon, which I think will be helpful in the long run.
Juliana
December 10, 2012Thanks Nicole! I’m gonna report back to her and hope that it will help! 🙂
beccie
December 20, 2012hi.
i tried tempering the other day for the first time and it did have the ‘snap’ but melted far to easliy in hands.
my question is that all other instructions on how to temper has a third temperature saying that after you have added the extra chocolate to cool it down, you then have to then bring the temperature back up to around 92f.
is this not needed then?
hope you have a happy christmas/holidays. (im in the UK)
Nicole
December 20, 2012Beccie – If the chocolate melted very easily in your hands, you have to think that it might not have been tempered quite right, but it is hard for me to know without seeing the chocolate (room temperature, etc. can all play a part with how easily the finished chocolate melts).
Some tempering methods call for melting the chocolate, cooling it down quite a lot and then heating it up again to make it more fluid and easier to work with. You don’t need to do that for this method of tempering. If you find that your chocolate is too thick to work with easily, however, you can warm it up a degree or to and then work with it.
Alexandra
March 5, 2013I tried this method and (as far as I can tell!) it worked perfectly. 🙂 The chocolate set within a few minutes, and it has a shine, but it’s not ultra shiny like melted chocolate is. Does that sound like I did it right still?
Also, I have a few questions about the process. I’ve read before that the seed chocolate must already be tempered. Is that true? Secondly, how cool can the chocolate get before the whole tempering process must be repeated? Or does it not matter so long as you don’t heat it above 90 degrees when warming up again? Thanks so much for the help! Your instructions have been the easiest to follow that I’ve seen.
Nicole
March 5, 2013Alexandra – It sounds like you got it just right!
To answer your questions:
Yes, the seed chocolate must be tempered. Fortunately, most chocolate sold is tempered (since untempered chocolate doesn’t look too hot and doesn’t hold up well for shipping), even chocolate chips.
When your chocolate starts to get too thick to work with easily, it has cooled too much. But you don’t need to repeat the whole process. You can simply pop it in the microwave for a few seconds (think: 5-8 seconds) to loosen it up a little bit, then stir well until the chocolate is more fluid. This works because microwaves basically spot-heat the melted chocolate, so the majority of what is in your bowl will still be “in temper” and the part that melts will be brought back to temper just by stirring it in.
I’m so glad you found this post to be helpful!
Alexandra
March 6, 2013Thanks so much for the explanation! So here’s my next question for you: the Guittard chocolate in the photo above (third from the top) has those whitish-marks on it which I always thought was bloom. So that chocolate isn’t what you used as a seed, is that correct?
Nicole
March 6, 2013Alexandra – Good question. That chocolate is tempered and has not bloomed. And I did use it as my seed. The whitish marks on the chocolate in that photo are actually from the chocolate pieces banging around in the bag. It just marks up the surface. If they had truly bloomed, the pieces wouldn’t “snap” when you broke them in half and they would start to melt fairly easily when you handle them.
Chocolate that is sold in bulk like this, and is intended to be used in baking or chocolate-making applications, will often look a bit knocked around even though it is still tempered, simply because they don’t need to keep it looking as pristine as a consumer chocolate bar and can be more flexible on the packaging.
Alexandra
March 7, 2013Thanks so much Nicole! I often buy Ghirardelli baking chips and they always look like that. I kept wondering why they would sell them like that, assuming that it was bloom. I’m so glad to know that’s not the case. 🙂
Alexandra
March 7, 2013Coming back at you with one more question… why is it that, with this method, you don’t need to cool the chocolate below the working temperature before bringing it back up? I know you mentioned to someone else that it’s not necessary, but I was hoping to understand why.
Nicole
March 7, 2013Alexandra – When you add in seed chocolate, you are adding in a bunch of “good” cocoa butter crystals to your melted chocolate (which is melted to the point where it contains no crystals). So, the seed chocolate cools down the melted chocolate to the point where crystals can start to form and those new crystals build on the “good” crystals in the seed chocolate – producing a batch of completely tempered chocolate.
When you lower the temperature of melted chocolate a lot, it will start to produce some of its own “good” crystals, and that becomes the foundation for tempering chocolate with methods where you don’t add in tempered seed chocolate, which is why some methods call for that. Does that help?
Alexandra
March 11, 2013Yes, that makes perfect sense! Thanks again for all your help. 🙂
mike
March 16, 2013You mention that after you temper it, if it cools, you can use the microwave to heat it back up. If I start with tempered seed chocolate, why can’t I just use the microwave to begin with?
Nicole
March 17, 2013Mike – You can, but frankly working this way is much easier and more reliable if you are starting out and don’t have that much experience tempering chocolate.
John Daily
February 15, 2014Thanks for posting this 101! What infrared thermometer did you use / can recommend?
Beverley
December 23, 2014I tried melting 80% chocolate bar over a water bath . I wanted to make my own chocolate covered nuts. I did not temper it because I knew nothing about this. The chocolate set ok but melted too quickly in the hand.
I am going to try again with tempered chocolate and hope I can have better success.
Thank you for all your help.
Bhawna
January 19, 2015I’m fairly new to chocolate melting and tempering… Can chocolate compounds be used for this… I heard frm my friend that how she made some chocolate candies at home and tried to recreate that without any prior information… It looked good and shiny but a bit hard… What could’ve been the reason here.
Thanks in advance
Nicole
January 19, 2015Bhawna – Only pure chocolate – as in cocoa butter – can be tempered, not chocolate compounds. There are many products out there that allow you to create a chocolate-like product without tempering (one is called Candy Melts), but they are not real chocolate.
Diana
May 16, 2015Damage is done … I now know the chocolate did not temper on the bars ….. A lot granola bars ;(
The Gourmet Grocer
October 6, 2015Thank you for these lessons on chocolate tempering. I should try this myself but I need to buy that thermal thermometer (cool kitchen gadget!).