Archive for January, 2009

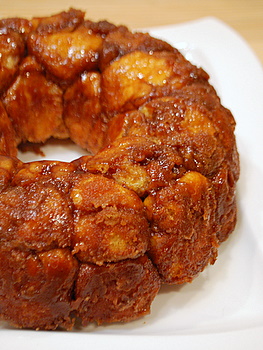
I have always assumed that monkey bread gets its name from the fact that you need to pull it apart with your fingers to eat it, getting all sticky from cinnamon and caramel as you indulge in bite after bite of warm, sweet bread. The bread is nothing more than a big pile of dough balls that have been dunked in butter and sugar before baking. If you like gooey, sweet cinnamon rolls and warm, sugary donuts, you will love monkey bread.
There are a lot of recipes for monkey bread that use refrigerated biscuit dough. This bread is made entirely from scratch, starting with a simple, yeasted bread dough. The dough only has a little bit of butter and sugar in it to give it some flavor; the vast majority of the flavor of monkey bread comes from the butter, cinnamon and sugar coating that the dough is dipped into. I did give in and add a tiny bit of vanilla to the dough – although you could certainly leave it out – for a little bit more flavor.
It’s helpful if you have an assistant (or child) for making this recipe, as your fingers tend to get a bit messy when working with the dough. The balls are formed by hand, loosely rolled from small pieces of dough. Each one needs to be dipped in butter and rolled in sugar before it goes into the bundt pan for baking. The process doesn’t take too long and certainly isn’t difficult, but it’s nice to have two sets of hands moving things along (plus, the dough is easier to handle if your fingers aren’t covered in butter and sugar).
Monkey bread can really be made in any size or shape of pan, but it is most often found in a ring shape, like that of a bundt or kugelhopf pan. This large ring makes for a great presentation, and it also makes the hands-on food easily accessible to a big group – making it perfect for a family brunch or other get together.

+Continue Reading

Whether you’re a fan of Hershey’s chocolate bars or not, it’s design is undeniably a classic confectionery icon: a flat, rectangular bar divided up into bite-sized pieces that are easy to snap off. I don’t know that Hershey’s was the first chocolate maker to use this design, but it is the one that is certainly the most well known for it. Williams Sonoma is currently carrying a Chocolate Bar Brownie Pan that uses the iconic look of the chocolate candy bar to make brownies look even more chocolaty than they are to begin with.
The pan, which is made by NordicWare, is heavy duty cast aluminum and measures 13.5″ x 6.5″ x 1.5″. It will work for a recipe scaled to a standard 9×13-inch pan. This pan will work best for denser recipes, like brownies (as the name of the pan suggests), fudge or flourless chocolate cake. Other cakes, while they will still bake up just fine, will not be left with as distinct an impression of the candy bar design and details will be more difficult to make out, even though the nonstick finish of the pan should help the cake release easily.

Aebleskiver are popping up all over the place. The shaped pans are available in just about every kitchen store, while just a few short years ago, very few consumers (US consumers, at least, as the pans are a Danish) had heard of the pancakes. Well, some people still aren’t sure on the name because those kitchen stores tend to prefer calling them “pancake puffs,” “filled pancakes” or other similar nicknames. Whatever they’re called, the fluffy pancake balls are tasty and easy to make. The only trick to them is getting them turned over in the pan so that they cook evenly and actually turn out to be little spheres, rather than slightly smushed dough balls.
The traditional way of turning aebleskiver is to use a crochet hook to snag the side of a pancake and give it a quick turn halfway through the cooking process. For most of us, a long, thin stick or skewer will work just as well. The skewer should be inserted into the top of the pancake at an angle, so it pokes through the “shell” that is already cooked against the pan. Once the skewer is in, it should be easy to give the pancake a quick turn. You’ll get an even brown all over, and won’t be able to see the tiny hole you made when turning the pancake.

Heart shapes for Valentine’s Day sweets are commonplace. Chocolate candies can turn up in heart shapes, and it’s easy to find cookie cutters that are, too. One of the reasons I find this Love Silicone Cake Pan to be so appealing is that it’s just a little more interesting than your standard-issue heart shaped pan. The pan is shaped into the word “Love” and it can easily be read once a baked cake is turned out onto a serving platter. The letters of the word are all joined together, giving the cake a cute and handwritten look. Because the pan is silicone and easy to peel away from the finished cake, this cake is easy to handle and you don’t have to worry about breakage or deforming the cake when you take it out of the pan. The cake is 15″x5.5″x2.5″ and you should be able to use the batter for a 9×9 or 9×13-inch cake in it.
And, just in case you didn’t notice yet, this pan does still have some heart shapes to offer: the center of the “o” and “e” are both little hearts.

Key lime pie is such a great way to use up a few limes. The standard key lime pie filling only really has three ingredients, and since it’s usually poured into a graham cracker crust, using a ready-made one brings the time required to make the pie down to almost nothing – although it’s worth noting that the pie must be allowed to set-up in the fridge for at least 4-6 hours (pref. overnight) before slicing.
The ingredients needed are limes (key limes or regular will do), eggs, and sweetened condensed milk. All you nned to do is whisk them together and you’re set. The milk is very thick and very sweet, but provides a great texture and background for the lime. The eggs help keep everything together. The filling is silky smooth and has a vibrant, juicy flavor that keeps it from tasting too heavy or rich.
Instead of using a regular graham cracker crust, I made my crumb crust out of crispy lemon cookies – hence the “double citrus” name for this pie. It added a great extra burst of flavor to the pie, which is especially delightful if you’re a citrus lover! Now, while I used lemon wafers for the crust, you might not have any available. If not, use regular graham crackers – not cinnamon graham crackers – and add either 2 teaspoons of lemon zest or 2 tsp lemon extract to the crumbs as you make the crust. The graham cracker crust will have a slightly more brown sugary flavor to it, but the lemon will come through regardless.
I usually make unbaked key lime pies. The acidity of the lime juice – and it is vital for the flavor to use fresh – “cooks” the otherwise raw eggs in the filling, much as lime juice “cooks” the fish used in ceviche dishes. While I like to stick to tradition, most recipes for key lime pie these days recommend baking the filling. To ensure that my recipe archives cover all the bases and will offer recipes that show both options, I baked my filling for this pie (even though I didn’t really have to). There is little difference in the texture of the two methods once the pie has chilled overnight in the fridge, so feel free to go either way. You’ll enjoy the resulting pie no matter how you get there. +Continue Reading