Filed under Recipes, Savory Snacks, Dips and Sauces, Sauces by Nicole | 15 comments

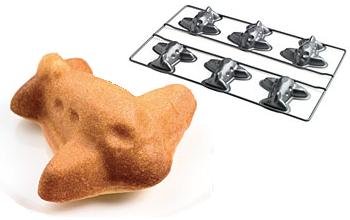
Chipotle peppers are known for having a smoky sweetness, with a slow but strong heat. The spice is what makes them so great, but the sweetness is fairly unique and lets chipotle work very well when paired with some much sweeter things. Honey and chipotle is one of my favorite combinations for a salsa. It wasn’t a stretch to make it into a smoky sweet barbecue sauce - perfect for pairing with anything grilled.
My sauce has a ketchup base, sweetened with a good amount of honey and spiked with a bit of Worcestershire sauce and vinegar for tang. And, of course, it has chipotle peppers. I used a food processor to blend everything together. Mincing up whole chipotles is effective, but wasn’t enough to provide the smooth consistency that I really like in a barbecue sauce. Using a food processor also ensures that the sugar will be well incorporated into the sauce. I definitely recommend a food processor, if you have one available to use.
The sauce is quite thick and has a consistency that is similar to ketchup. It thickens up even more once it has been refrigerated, since honey tends to thicken when it is kept below room temperature. If you prefer your sauce to be slightly thinner for any reason, you can add a tablespoon or three of water to the mixture when you’re making it. If (like me, in this case) you like your sauce to be quite thick so that it can adhere generously to anything you dip into it, just make the recipe as-is.
(more…)
Filed under Recipes, Cakes - Cheesecake, Chocolate by Nicole | 12 comments

Light and fluffy souffle-like cheesecakes are nice, but not everyone is going to be satisfied with that type of texture for a cheesecake. Others want their cheesecake to be rich, creamy and dense. In fact, this sort of texture is almost a signature of cheesecakes, since few other baked good can (or would want to) achieve it. This Mocha Chocolate Chip Cheesecake is a great example of this type of cheesecake. It is rich and filling to the point where you really only want to eat a small slice at a time, but it has a great flavor and is satisfyingly smooth and creamy to eat.
The flavor for this cake was, not surprisingly, inspired by one of my favorite drink combinations: coffee and chocolate. I started out with a chocolate crust, an easy one to make that doesn’t need to be cooled before the batter is poured on top. Cheesecakes don’t typically have a lot of liquid added to them, and when they do, it is often something that adds extra richness, like cream. I opted to use instant espresso powder to add a good shot of coffee flavor to the cheesecake. Instant coffee powder will work just as well, so use what you have on hand.
I used melted chocolate to get the chocolate into the cheesecake. I used semisweet chocolate (61% cacao), but you can go with a darker or milder chocolate as long as you choose a good-quality one. You can either use the microwave or a double boiler to melt your chocolate, but be sure to let it cool down before incorporating it into the batter. The melted chocolate doesn’t do too much to change the consistency of the batter (unlike a dry ingredient like cocoa powder that might thicken it up too much). The batter will be quite thick, perfect for suspending chocolate chips or chocolate chunks without letting them fall to the bottom of the cake.
The finished cake is absolutely gorgeous looking, and mine baked up to be both even and smooth. Thicker batters seem to hold together better during baking and not crack as much (although I don’t personally mind if the cake cracks), and there is no need to use a waterbath for this cake, either. The coffee flavor is mild, but comes through the chocolate flavor just enough to round out the dessert and give the flavor some dimension. I could only handle small slices, but you can bet that I went back for a few of them. (more…)
Filed under Sweet Stuff, Product Reviews by Nicole | 2 comments

It’s been a couple of months now since Starbucks released their chocolate line - the line that is sold in non-Starbucks stores, like Target - and I’ve been wanting to try several of the options since I first spotted them. The chocolates are a result between the collaboration of Hershey’s and Starbucks, and after reading good things about them on Candyblog, I was even more intrigued. When they went on sale at a store near me, I was sold and picked up the bar that appealed to me the most, the Mocha Dark Chocolate.
The bar is made of smooth, rich-tasting dark chocolate with finely ground coffee beans incorporated into it, and since I love chocolate covered coffee beans, I wasn’t surprised that I really liked the flavor that they brought in. They added texture to the bar, but were not really “crunchy” since the piece were fine. The bar is put together extremely well, given that the grains of coffee bean do not detract from the smoothness of the chocolate, or make the chocolate itself seem grainy. In fact, the chocolate melts in your mouth almost immediately when you bite into it.
The only- very small - complaint I have is that the bar’s beautiful design doesn’t allow you to snap off a block or two for easy eating and I prefer that type o portion control to snapping off randomly shaped chunks when snacking. I’ll give the bar bonus points, however, because I happen to really like the coffee beans imprinted on the top of the chocolate. And, overall, I’d take one of these bars any day and the lack of an easy-snap design probably wouldn’t come into play because I know that I’ll eat more than I should in one sitting anyway.
Filed under Cooking, Baking, Gear and Gadgets by Nicole | 5 comments
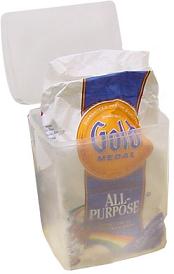
Buying food, especially dry goods or other products with fairly long shelf lives, in bulk is a good way to cut back on your grocery bill. You get a lower overall price per pound or per ounce. The only problem with buying in bulk is that whatever you buy has to be stored properly to give it its optimal shelf life and to prevent spoilage. Basic pantry ingredients are great choices for bulk buying because you always want to have them on hand. You just need to choose foods that can last for a long time, rather than something that needs to be used up very quickly.
Flour is a pantry staple that anyone who bakes (and most people who cook) will want to have, and although it can have a long shelf life, it also needs special care. Flour should be kept in an airtight and moisture-tight container set up off the floor. The typical flour bag size is 5lbs, and bulk bags generally run up to 25-40 pounds. If you choose a very large container, it should be large enough to hold the bag without having to pour the flour out (keeps things cleaner, generally) and should be relatively easy to open/close when you need to use the flour.
All purpose flour, as well as cake flour and other “white” flours, can keep for 6-12 months in good storage conditions. Whole wheat flour should not be kept as long, since it contains more of the grain of the wheat and has a much higher spoilage rate (it can turn rancid and taste off after a while) than all purpose flour. Flour should be kept in a cool environment, as the grain can spoil. It does not need to be kept in the freezer, although the freezer temperature can prevent spoilage from taking place or insects from getting to the grain. It is very important to use an airtight container in the freezer, as humidity from a refrigeration unit can adversely effect the flour. Your storage containers should also be kept out of the sunlight, in a dark or dim place.
Some flour storage containers are built to exactly fit the flour bag. Others are smaller and require you to pour the flour out of its original bag, but work well if you use the flour regularly and don’t want to pull it out of a larger storage container. If you buy in bigger bags, a restaurant-type storage container can actually work very well at home, although there are smaller bins that will hold up to 25-lb bags, too. If you just want to keep that large bag in something airtight, a giant ziplock bag will do the trick, as well.
Filed under Recipes, Savory Main Dishes, Pies by Nicole | 8 comments

Normally, when I think of a spinach and feta pie, I think of some rendition of spanikopita. The savory Greek dish has a filling made with spinach, feta and eggs that is sandwiched between layers of filo dough. The spinach-feta combination is a winner in my book and I like it in any form. I used the idea of a spanikopita-type filling as inspiration for the filling of this savory, open-faced pie.
This is a good brunch dish, but is also a great vegetarian dinner option when you’re looking for something quick and easy. The filling is actually similar to a fritatta in makeup. I started with cooked garlic, onions and spinach, and added in eggs and feta cheese. The filling isn’t overly eggy but is enough to hold all the other ingredients together. It bakes up to be firm, but tender, and is best eaten when it is fresh out of the oven. The spinach - even though it is cooked before being added to the filling - could give off some additional moisture as the pie sits, whether at room temperature or in the fridge. The flavor of any leftovers is still good, of course, but perhaps not ideal for serving to guests.
One of the most interesting things about this pie is the crust. I used sliced (whole grain) sandwich bread pressed into the pie plate to form the base of the pie. It’s quick, easy and you can use any type of bread you like. Be sure to press the bread down very firmly so that it makes a good seal in the pie plate. It is ideal if you have two pie plates and can sandwich the bread crust in between them to press it into place. A traditional crust can be used (it should be baked before the filling is added if you go this route), but this makes it a bit more unique. The bread bakes up to be quite sturdy and presents a nice contrast for the slightly eggy filling. The top crusts can be removed if you prefer a more uniform/traditional appearance.
(more…)
Filed under Foodies and Chefs, Baking by Nicole | 0 comments
- You can never have too many variations on a theme when it comes to chocolate chip cookies, and one of the best things about food blogs is that they offer plenty of inspiration for new flavor combinations. Take Nook and Pantry’s Chocolate Chip Pistachio Candied Orange Cookies, for instance. A few tweaks and you’ve taken chocolate chip cookies to a whole new level.
- Little custard tarts are one of those great tea-time indulgences that you just can’t stop eating - even though you know you should after eating two or three. More Than Burnt Toast baked up some lovely looking Portuguese Custard Tarts. The recipe uses premade puff pastry as a crust, so these really are very simple to make, even though they turn out looking quite elegant.
- Speaking of bite sized desserts, Cooking with Amy also went the miniature route this week with some Mini Rhubarb Strawberry Galettes. Each freeform tart offers up a few bites of tender pasty, fresh fruit and lots of sweetness. The recipe can be played with to use other fruits, and will take only a couple of minutes to put together as long as you make the dough in advance.
- Bacon ice cream is one trendy foodie item that I can’t quite get on board with, no matter how interesting Jumbo Empanada’s version sounds. The recipe is actually from David Lebovitz and uses bacon that has been candied to give it some extra sweetness. I’ll stick to bacon with breakfast, but feel free to experiment with this dessert version if you want to get in your daily dose before bedtime.
- I’ve mentioned before that I’m a sucker for muffins with a streusel topping, not only because streusel tastes good, but because it adds a lot of extra “oomph” to an otherwise ordinary muffin. Closet Cooking’s Blueberry Maple Oatmeal Muffins with are nowhere near boring to start with, loaded with maple syrup, mashed banana and lots of berries, so you can imagine that they only get better when topped with cinnamon, sugar and toasty pecans.