
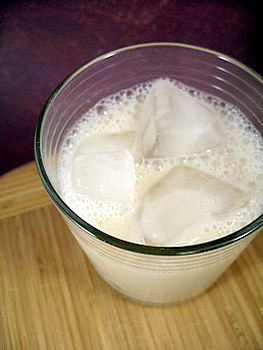
Horchata is a broad name for any of a variety of drinks, popular in Spanish countries like Spain and Mexico, that start out with a nut or grain soaked in water. The drinks are often similar to products like rice milk and other nondairy milks, but usually have a much creamier consistency and are both sweetened and spiced. Most recipes that I’ve seen feature both nuts and a grain, usually rice, soaked in water for some period of time and then strained out before flavoring. The drinks are fairly simple to make and, in spite of the fact that they don’t necessarily have long ingredient lists, they often have a great complex flavor.
While horchata can be made with many different types of nuts (chufas/tigernuts are popular in Spain, for instance), Mexican horchata is often made with almonds and that is the type that I am most familiar with. To make my homemade horchata as quick and easy as possible, I opted to start off my batch with almond milk. Not only did it save me time, but I was able to find lightly sweetened vanilla-flavored milk, which gave me a fairly rich base to start from.
To the milk, I added ground rice that I had pulverized in my coffee bean grinder, along with sugar and cinnamon. I let the mixture soak at room temperature overnight (there really isn’t a risk of almond milk curdling, unlike dairy milk) and then ran it through a very fine strainer before chilling. The result was fantastic. It was creamy – much creamier than the almond milk alone – and had a wonderfully sweet-cinnamon flavor to it. It was really close to the versions sold at some of my favorite local Mexican restaurants and took very little time and effort to assemble. This will definitely be a regular feature in my kitchen now!
+Continue Reading

When I first heard about the Cake Wrecks blog at neatorama, I expected to see an array of cakes that were poorly decorated – frosting sliding off, writing smeared, etc. Instead, the cakes were far more creative. Some were wrecks in the sense that they lacked good taste and probably seemed like funnier or better ideas before they were actually put into the reality of cake and icing, like the Foot Binding Cake for a podiatrist. Some just seem generally inappropriate. Others were literal wrecks, like this James Bond-themed cake that featured a plane crash. The archives are great and definitely worth a look.
Looking through these pages made me think back to cake wrecks I’ve experienced, or witnessed. The ugliest cake was undoubtedly one where the frosting never set and began to run as the cake was served. It taught me a lesson about the need to refrigerate cakes before during a heat wave and making an extra effort to keep the kitchen cool – either by keeping outside sources of light/heat out or keeping the air conditioning on – when I’m making buttercream. The strangest cake was not one that I made, but a SpongeBob Squarepants cake served to a 20-something man for his birthday. I initially thought that there had been some mistake on the part of the bakery, but it turned out that the relative who ordered the cake just thought it would be cute (and perhaps did not have a clear idea of the fact that young men would not be likely to “ooh” and “aah” over a child’s cake, no matter how cute it was – especially when none of said young men were particularly interested in SpongeBob at any point in their lives). The cake was eaten, however the first reaction to seeing it was confusion, followed by general amusement.
What’s the strangest cake or “cake wreck” you’ve ever encountered? I’m a bit curious now to know whether these… unusual cakes are more common than I thought.

I will always be a fan of white-ish sandwich breads – not necessarily “white bread”, but buttermilk, potato and similarly pale and soft breads that are versatile and toast well – but I also like to get some variety into my sandwiches with whole grain breads, as well. One bread I particularly like right now is Oroweat‘s Oatnut Bread. As the name suggests, the bread has whole oats and nuts in it. The oats give it a nice sweetness and the nuts, a nice texture. Oroweat actually uses finely chopped hazelnuts in their bread, so the flavor is very unusual for a sandwich loaf.
My version of homemade Oatnut bread has more whole grain than the original bread it is based on, as I made it with white whole wheat flour. The store-bought bread has a fairly fine texture and, because white whole wheat flour is lighter than plain whole wheat, I used it in the hope of recreating that texture. Since whole grain flours don’t usually have as much protein in them as all purpose or bread flours, I also added some vital wheat gluten (basically wheat protein, sold at markets like Whole Foods) to help give the bread some additional elasticity. Wheat gluten keeps the texture of the bread from getting dense or crumbly. I also added in rolled oats (I used the quick cooking variety, but whole rolled oats are fine) and finely chopped pecans. Hazelnuts or walnuts are also good choices here.
The finished product was excellent, and similar enough to the original that the source of my inspiration was obvious. My bread was slightly sweet and the nuts provided some of the contrast in texture that I had hoped for. The loaf had a light and even crumb to it and was easy to slice into thin, sandwich-able pieces. If you can’t find the wheat gluten, you will be able to bake this bread without it. You may not be able to get such fine slices, however, as a bread made with only whole grain flour will probably be a bit more crumbly than this loaf was.
This bread makes great sandwiches and excellent toast. It’s hearty enough to stand up to a cheese, as well, so simply cut thick slices if you wish to put it out with appetizers as a pairing for dip or sliced cheese. +Continue Reading
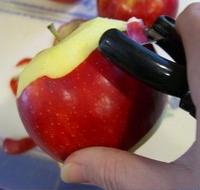
There are many types of fruit and sometimes it seems like there are almost as many ways to peel them. Bananas, oranges and grapefruits, for instance, are all very self-explanatory fruits that require little more than a tug at the skin to remove it. Other fruits pose more of a challenge. If you’re just going to eat a piece of fruit, the skin might not be a big deal, but if you’re going to bake with it, sometimes the skin just has to go.
For hard and (relatively) dry fruits, a sharp knife will do the job quickly and easily. Apples and pears can often be skinned this way before going into a pie or tart. For softer and more delicate fruits, the traditional method of peeling is to cut a shallow cross in the bottom of the fruit and then blanch them in boiling water for a minute. This loosens the skin and, when you run the fruit until cold water, it usually comes right off. The downside to this method is that it can be a bit time consuming with all the steps involves – boiling water, prepping fruit, removing skins, drying fruit – and it’s hard to get up that kind of energy when you only need to peel a peach or two.
As I mentioned before, a plain vegetable peeler will work for some fruits, but they’re not the best choice for all fruits. Fortunately, many companies make serrated fruit peelers specifically for getting the thin skins off fruit without damaging the flesh beneath and these can work wonders. The serrated peelers have less “drag” when cutting the fruit, so they get cleaner cuts than regular peelers and do minimal, if any, damage to the flesh of the fruit. I have an OXO serrated peeler that works very well. Peeling is definitely faster than the blanching method – unless you’re making many pies at once and need a few dozen nectarines all at once. Then, I’d use the blanching method and a big pot.