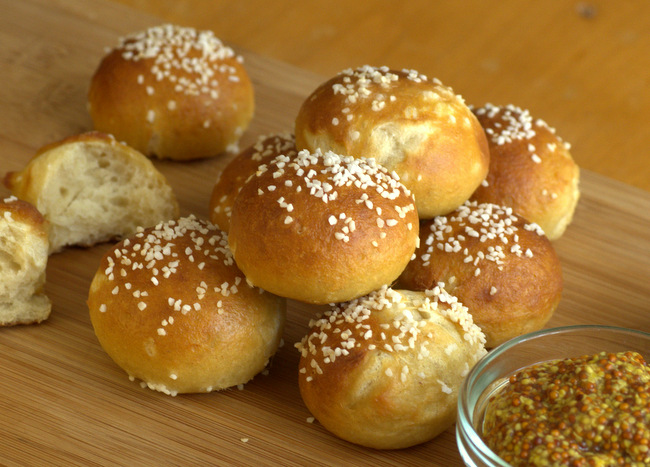
Archive for the ‘Breads – Yeast Breads’ Category

I am a big fan of no knead yeast breads because they always seem much less labor intensive than regular breads. Kneading dough is fun and a good tension reliever, but they do tend to make a little bit more of a mess than no knead breads do. You might picture one style of crusty, rustic bread when you think of no knead breads when, in fact, there are many different types of recipes that can be adapted into excellent no knead recipes.
This No Knead Cinnamon Raisin Bread is a sandwich-style loaf bread that is an easier to make version of Cinnamon Swirl Bread – but still makes excellent cinnamon raisin toast. The dough has brown sugar, cinnamon, vanilla and (of course) raisins incorporated directly into it and it is all kneaded in a stand mixer, so there is no hand kneading or rolling required. You don’t get that lovely swirled look in your finished bread, but you will be able to cut at least 50% of the time and work from the recipe by giving it up. For me, that means I can have cinnamon raisin bread a lot more often, so it is a trade off that I am willing to make!
The bread smells amazing when it comes out of the oven, and the scent of warm cinnamon with a hint of yeast will fill your kitchen within seconds. The bread isn’t sweet, but it does have a hint of brown sugar to emphasize the sweetness of the raisins, which plump up slightly during baking. The cinnamon comes through strongly, but isn’t overwhelming, so the bread tastes very well balanced. It is soft, moist and light. I used golden raisins, though any kind of raisins you have on hand will do. You can even increase the amount of raisins if you happen to like your bread extra-raisiny, or you could replace some of the raisins with a small amount of chopped nuts for some crunch. Walnuts or pecans both work very well with raisins. And, of course, you could add a little allspice to the cinnamon to make the bread a bit spicier for yet another variation.
Make sure that you allow the bread to completely cool before slicing it, or the bread may be slightly crumbly. Use a serrated knife to get clean slices, and if your knife is sharp you’ll be able to easily cut thin slices for extra crispy toast and thick slices for making french toast.
+Continue Reading

A fluffy cinnamon bun that is packed with a sweet, buttery filling and topped off with just the right amount of sticky glaze is a breakfast treat that is just about irresistible. Cinnamon buns can be a lot of work to make, however, since you need to prepared a yeast dough and there are several steps that include rolling and re-rolling the dough just to shape them. This Cinnamon Bun Bread recipe is one of my favorite twists on a cinnamon bun because you get all the same flavors as you find in a traditional bun – but without any of that work.
This Banana Cinnamon Bun Coffee Cake is a twist on that basic bread that includes a little bit of banana to give the dough a little more flavor and make the coffee cake a little more unique – while keeping that cinnamon bun-inspired tastiness. The dough is an easy to make yeast dough that includes mashed banana, cinnamon and ground nutmeg. It doesn’t have to be kneaded once it is all mixed together, just poured into a prepared pan and left to rise while you prepare the topping mixture.
The topping is a mixture of butter, cinnamon, flour and spices, with a pinch of salt added just for contrast. It looks very much like the crumble mixture that you might put on top of a classic coffee cake. In this recipe, however, it is swirled and folded into the yeast dough to spread that sweetness throughout the coffee cake and make sure every bite has some cinnamon flavor. I always make sure that a little extra is sprinkled on top before baking, too.
The finished bread has a light, tender texture and that combination of butter and cinnamon that we always associate with cinnamon buns. The nutmeg and banana come through, as well, but are a little more subtle in the presence of that cinnamon and brown sugar topping. The bread is great on its own and can also be finished with a little drizzle of glaze (the recipe is given below, although I did not glaze this slice of cake) to give it the right amount of stickiness. I serve this both for breakfast and dessert, and since it is a no-knead yeast recipe, I find that it can fit into my schedule any time of day.
+Continue Reading

Pumpkin is a great addition to yeast breads and rolls because it adds a lot of moisture that keeps the breads nice and soft. It also adds a subtle and slightly sweet flavor to the bread, too. These Browned Butter Pumpkin Dinner Rolls get both of these benefits from the pumpkin puree in the recipe, as well as gaining just a little bit of heartiness that makes these dinner rolls both tasty and satisfying. They are great with all kinds of soups and chilis, and they go especially with with big roasts (like a turkey dinner!) because they sop of gravy very, very well.
The browned butter is also an important component of this recipe. Melted butter could be used instead, but browned butter has a slightly nutty flavor that makes the rolls a little more unique – and just a little more irresistible. When you brown the butter, whether you do it on the stovetop or in the microwave, brown a little extra butter than is called for in the dough and set it aside. Use this extra butter to brush the tops of the rolls before and after baking to give them a little extra flavor and a nice finish.
The amount of flour in these rolls is approximate for two reasons. First, your climate can have a big impact on how much water your dough will need. Second, the consistency of your pumpkin puree can bring more or less moisture to the dough. If your puree has more water, you may need to add a little more flour than the recipe calls for, so be flexible and add a little more flour as needed to get the dough nice and elastic. The rolls can be shaped in to any size. You can also bake the individually, on a baking sheet, instead of all together in a baking dish as I have done. I personally like the “pull apart” style of dinner roll, and baking the rolls in a baking dish also means that you don’t need to be an expert at shaping dough into rolls to get great results.
These rolls keep very well for several days when kept well-wrapped, so they can be made a day or so in advance of serving them. +Continue Reading

One of the wonderful things about focaccia is that it is a bread that can be topped with just about anything, so you never run out of options when making it. Potatoes might not be the first thing that spring to mind when looking for something to top off a loaf of bread, but they turn this focaccia into a very savory and hearty bread.
This Potato and Herb Focaccia is a relatively new favorite of mine. A basic focaccia dough is topped with sliced potatoes, herbs and olive oil before being baked, and you end up with a topping that has a tremendous amount of flavor and really stands out from other focaccia breads. The bread ends up being light and chewy, with a slightly crisp crust that gets a lot of flavor both from olive oil and from the herbs. The potatoes are cooked before they are put on top of the bread, so they are already tender, but they take on a nice roasted flavor in the oven and develop a hint of crispness themselves on top. The combination is addictive, and so satisfying that you can easily make a meal out of a nice salad, some wine and this bread.
I used smallish yellow potatoes for this focaccia. I boiled them just until they were tender, and then allowed them to cool completely before using them. You can easily prepare the potatoes the day before and let them hang out in the refrigerator until you’re ready to use them. I think that a smaller potato is going to give you better results (and look a bit prettier) than a big baking potato, but as long as the potatoes have been pre-cooked, you can use what you have on hand. I also used an herb de provence spice blend, but any combination of your favorite dried spices – such as rosemary and/or thyme – can be used in the topping for good results. Don’t forget a sprinkle of coarse salt before putting this bread into the oven, because it will really give the bread and the potatoes a nice finish.

+Continue Reading

The difference between sticky buns and cinnamon buns is that sticky buns have a sticky caramel topping that is baked onto the buns and cinnamon buns don’t, and are typically finished off with a drizzle of icing. The caramel for sticky buns is made at the bottom of the baking pan with butter and sugar and the unbaked buns are placed on top of that layer. After baking, the buns are flipped upside down and you’re left with a gooey, sticky and completely irresistible breakfast favorite.
These Sticky Buns with Golden Raisins are the perfect dish to make for a weekend brunch. They are delicious and not as difficult to make as they might look. The base for these buns is a simple yeast dough that is very soft and lightly sweet. The dough is made and allowed to rise for about 90 minutes. Then, it is rolled into a big rectangle to be spread with butter, cinnamon, brown sugar and raisins before being rolled up into a tight spiral and cut into buns. You could actually place them on a baking sheet and turn them into cinnamon rolls with icing added after) at this point, but I put them into a baking dish I had prepped with butter and brown sugar to bake.
The finished buns are light and tender, with a very soft crumb and a lovely layer of caramel on top. The light, caramely sweetness of the golden raisins is a perfect contrast with the golden brown sugar used to make the caramel in these sticky buns. Regular raisins will still work perfectly well, and you can also switch up the type of brown sugar to use whatever kind you have on hand. You could also add a handful of chopped pecans into the baking dish with the caramel if you like your buns with a little bit of a crunch, too. However you put them together, these buns are at their best when they’re warm – so dig in when they’re fresh from the oven and don’t hesitate to look for an excuse to bake some soon.
+Continue Reading