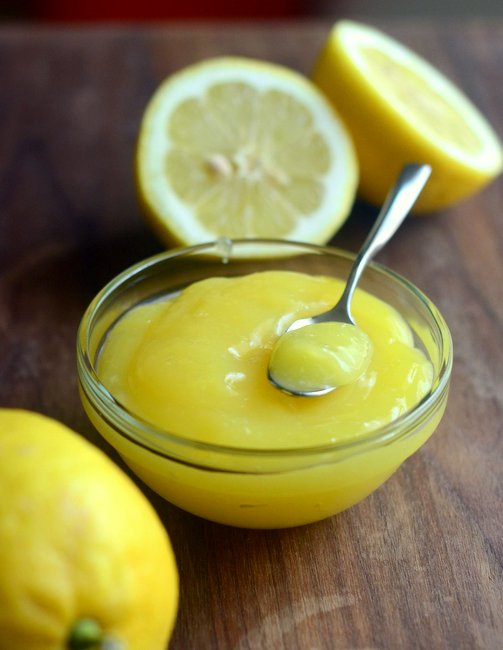
Archive for the ‘Dessert Sauces’ Category

Meyer lemons are a hybrid citrus fruit that are a cross between mandarin oranges and lemons. Meyer lemons have a bright lemon flavor, but are much less acidic than a regular lemon. This makes them seem a little sweeter, and their slightly milder flavor allows honey and floral notes to really come through in the juice. Meyer lemons can be used in recipes that call for regular lemons, and I put some to work in a batch of homemade Meyer Lemon Curd recently.
This curd is made just like your average lemon curd recipe – with eggs, lemon juice, sugar and butter – so it has a smooth, silky texture and a lot of flavor. Thanks to the Meyer lemons, it has a slightly sweeter and more complex flavor than some other lemon curds, although it still has plenty of zesty lemon flavor. It is delicious on its own, and makes a great accompaniment for vanilla scones or ice cream.
The butter stirred into this lemon curd and other fruit curds to finish them after cooking serves to make them even smoother and creamier than before. The butter also helps to thicken the curd up a little bit more. That said, I often make a Low Fat Lemon Curd that uses no butter at all, and you can actually omit the butter in this recipe if you are looking for a slightly lighter lemon indulgence.
+Continue Reading

Apple butter is a thick, smooth fruit puree made by slowly cooking fresh apples with sugar. It gets is name from the fact that the finished product is smooth as butter, not because there is any butter in it. There are many types of fruit butter out there, but apple butter is by far my favorite. Apples take very well to being turned into fruit butter and leave you with an amber-colored preserve that is bursting with sweet apple flavor.
My Homemade Apple Cider Butter is actually inspired by Smuckers Cider Apple Butter, which is a delicious product that the company only makes in the fall when apples are fresh from the orchard. It was actually the very product that launched the family-owned company back in 1897. Mine is made with lots of apples, apple cider and a mixture of brown and white sugar. The apples are cooked until they are tender, then pureed and cooked again with sugar until the butter-like finished consistency is achieved. Since you are cooking these apples down, the texture of the apples that you choose to work with doesn’t matter as much as it does when you are choosing apples for baking pie. You can use Granny Smith if you like tart apples or Fuji, which I tend to use.
I find that a blend of brown sugar and white sugar gives the preserve a real depth of flavor and is slightly reminiscent of apple pie – only more intense, because the mixture has been reduced by so much. I have used both plain apple cider and spiced apple cider in batches of apple butter with good results. Choose a good quality, all natural apple cider (or even apple juice) that you like the flavor of and you’ll be very happy with the results.
I use my homemade apple cider butter to top muffins, biscuits, pancakes, waffles and anything else I can think of pairing it with. I’ve warmed it up and put it on ice cream, and I’ve even turned it into an Apple Butter Pie. The rich apple flavor is sweet and addictive. This recipe doesn’t make a huge batch, so I simply store mine in an airtight container in the refrigerator as I use it (which doesn’t take long). If you are into canning, you could certainly can your cider butter after it has finished cooking and you can make a double batch if you want to have a lot of it on hand, or to give as gifts. If you don’t plan on canning, know that when stored in the fridge, a batch will keep well for at least two weeks.
+Continue Reading

I have a soft spot for jellied cranberry sauce as a Thanksgiving side dish, as that was a favorite of mine when I was a kid, but these days I am much more likely to make my own cranberry sauce with fresh berries to serve as a holiday side (and that includes Homemade Cranberry Jelly). I like cranberry sauces that the sweet-tart flavor of the cranberries shine through without being overly tart or sour, which can make the cranberry sauce overpower things like turkey and stuffing. This Blood Orange Cranberry Sauce fits the bill nicely. The sauce is made with whole cranberries, freshly squeezed blood orange juice and has whole piece of blood orange in it. The orange adds some extra sweetness to the cranberries while adding a bright, fresh citrus flavor to the sauce.
To make it, you’ll need a bag of fresh or frozen cranberries. Frozen berries will always work well for a sauce, but I typically use fresh berries when my local markets carry them. The berries are cooked with blood orange juice and whole blood orange segments from a supremeed orange. Supreming an orange means that you cut down a whole orange into its most tender segments, removing the peel, pith and the tough “skin” that holds the slices together (tutorial here). By prepping the oranges this way, you get very tender pieces of fruit to add to your sauce.
Blood oranges make a good color match for the cranberries and the juice is slightly sweeter than that of some other types of oranges. That said, you can easily substitute any other type of orange into this recipe if you don’t have blood oranges and still get tasty results.
+Continue Reading

Boston cream pie is an unusual type of layer cake, made with two rounds of sponge cake that are filled with pastry cream and topped with a glaze of chocolate ganache. It is basically like a giant custard sandwich, and quite unlike most layer cakes. I thought it would translate very well into a whoopie pie format, making a miniature version of a Boston cream pie that can fit right in the palm of your hand.
These Boston Cream Whoopie Pies start out with a simple buttermilk vanilla cake that makes a lightly sweet backdrop for the pies. The cake is tender and moist, but still sturdy enough to handle easily without breaking while you frost and fill them. The batter rises well and you don’t need to do anything special (aside from making the mounds even) during baking to get them to keep their shape. The pies are cooled and filled with a homemade vanilla pastry cream. I use a vanilla bean in mine to get the most vanilla flavor into my recipe, but vanilla extract will work, too.
Most of the Boston Cream Pies I’ve had have some kind of chocolate glaze poured over the whole cake before serving. This creates a beautiful picture, but I found that wasn’t really practical for a whoopie pie. I topped these with a layer of chocolate ganache, spreading it onto one side of the pie. It was just thin enough to give me a few drips around the edges on some of the pies, but mostly stayed exactly where I put it. This made the whoopie pies easy to store and to handle, and was simply a lot more practical way of topping these. Don’t worry if you have a bit of ganache leftover after you top off your pies. It is good eaten off a spoon, too.
The finished pies have a great mix of soft cake, creamy vanilla filling and chocolate glaze. They’re very satisfying – but also light enough to indulge in two at a time if you’re tempted. These pies can be served chilled or at room temperature, but I generally serve them the day they’re made and keep the leftovers in the fridge, well-wrapped. I typically top half of the cakes with ganache in advance, then pipe in the pastry cream before serving. They’re still tasty the next day, but it is hard to beat a freshly made Boston Cream Whoopie Pie.
+Continue Reading

Whipped cream is a great way to finish off just about any dessert, adding a light sweetness to contrast with rich berry flavors and intense chocolate ones. For many, using whipped cream means picking up a can from the refrigerated section of the grocery store. This isn’t a bad solution in a pinch (I know I’ve used it many times), but making your own whipped cream is quick and easy – and you usually get a much more satisfying result. Many recipes call for lightly sweetened whipped cream and making your own is also a great way to control the sweetness because lightly sweetening the cream just means adding in a little bit of confectioners’ sugar.
To whip cream, start by pouring some cold heavy cream or heavy whipping cream into a large bowl, then beat it with a whisk or an electric mixer until it reaches soft peaks. This will take anywhere from about 1-5 minutes, depending on how much cream you are whipping. Cold cream whips up better than less cold cream, and a larger bowl makes the whole process go faster. Towards the end of the whipping time, sift in a small amount of confectioners’ sugar to make lightly sweetened whipped cream. While plain whipped cream is just fine, adding a bit of sugar mellows the flavor of the cream and, frankly, just tastes better with dessert. Sometimes I add a bit of vanilla if I want the whipped cream, but this is completely optional.
Both pasteurized and ultra pasteurized creams can be whipped, though pasteurized will beat up a bit more quickly and will achieve slightly greater volume. Don’t be tempted to overbeat the cream, or you’ll end up making homemade butter. Homemade butter isn’t a bad thing, but if that is what you’re going for you’ll want to leave out the confectioners’ sugar!
+Continue Reading