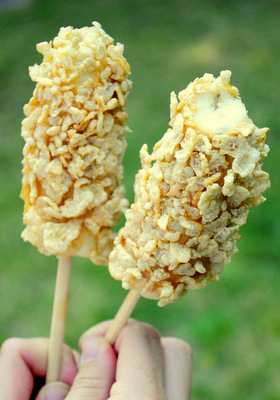
Who doesn’t like a creamsicle on a hot summer day? The ice cream-filled orange popsicle is a favorite summertime treat for many people – and this is that classic popsicle in cupcake form. These Creamsicle Ice Cream Cupcakes are orange cupcakes that are filled with vanilla bean ice cream and topped with a zesty orange glaze. Like their popsicle namesakes, these are stored in the freezer and ready to serve as a cool treat on a hot day or any other time that a creamsicle craving hits!
The cupcakes are easy to make and turn out to be moist and tender. I used both butter and vegetable oil in the cake, as cakes made with vegetable oil tend to stay a little bit moister after being frozen. Freshly squeezed orange juice is going to give you the best flavor in these cupcakes, and by freshly squeezing the oranges you’ll also have plenty of zest to further boost the flavor. If you don’t have oranges at hand, you can use bottled orange juice. Again, try to go with fresh, not-from-concentrate juice for the best flavor even when using bottled juice. The cupcakes will still turn out well, but the orange flavor might be slightly subdued. To punch it up even further, add a bit of orange extract or a few drops of orange oil to the batter.
The finished cakes have a great combination of orange and vanilla flavors. When I hollowed out the cupcakes to fill them with ice cream, I tried to make as much room for the filling as possible. I also used a good quality vanilla bean ice cream, slightly softened, to fill them up. The glaze added some extra sweetness and brightness to the cakes, and really reminded me of the orange “shell” that makes up the outer layer of a creamsicle.
These cupcakes should be stored in the freezer and taken out shortly before serving. Once they are glazed, allow them to set up in the freezer for at least an hour. At that point, you can cover them with plastic wrap and they’ll keep for a week at the very least (probably quite a bit longer if you have a lot of self control!). The orange glaze gives you a nice burst of orange when you take a bite, and it sets up very nicely in the freezer without getting too hard. If you are in a hurry to dig in, just stuff the cupcakes with ice cream, top with a spoonful of glaze and serve right away!

+Continue Reading

If you ever visited an ice cream truck as a kid, you’ve probably had a Push-Up. This type of popsicle packed sherbert or ice cream into a cardboard tube and you ate it by pushing up on a plastic plunger. They were usually a bit neater to eat than your average popsicle, and also were a little more fun (at least, I thought so!) because they were more interactive. If you’re in Southern California, you might be able to pay a visit to one bakery that is putting a new twist on the push-pop concept by adding cake. Pushcakes are cupcakes in push-pop form made by Meringue Bake Shop in Orange County. To make them, plastic tubes are packed with layers of moist cake, buttercream frosting, custards/creams/other fillings and topped with sprinkles to give you the full cupcake effect in a form that is even easier to eat. You simply remove the cap and push up from the bottom to have layers of flavor delivered to your mouth one after another. Another bonus to these cakes is that they travel even better than regular cupcakes because they don’t need to remain upright to stay in one piece.
So, if you’re in the OC area, you might want to give the original Pushcakes a try. If Southern California is too much of a drive from wherever you live, you can keep your eyes peeled for plastic push pop molds at cooking supply and craft stores and make your own version of pushcakes at home.

Many homemade popsicle molds make small, narrow popsicles that aren’t necessarily all that satisfying if you’re looking for a treat to cool you down on a hot day. This is not the case with Tovolo’s Groovy Pop Molds. This set of popsicle molds are big – each pop holds 4-oz of liquid – as well as easy to use, so you’ll be putting your set of molds to good use more often. I just used this set to make my Homemade Fudgsicles, and I really liked the broad, flat shape that the finished popsicles had.
Tovolo’s popsicle molds all come with a sturdy tray that their individual popsicle molds snap in to. These trays keep the popsicles upright while chilling and also allow you to take the pops out one by one when you’re ready to eat them. The molds are heavy duty BPA-free plastic which easily release the popsicles and are easy to clean. I also particularly like the sturdy lids/handles that finish off each popsicle, as they are easy to snap on and create such a good seal you don’t have to worry about making a mess of your freezer should one fall over in there. The lid also acts as a drip guard while you’re eating your pop.

Fudgsicles were one of my favorite summertime treats as a child. They are chocolate popsicles, with a great chocolate flavor to them. I’ve seen lots of recipes for Fudgsicles over the years and have noticed that, in spite of their names, none of them are really quite like the original Fudgsicles. Oh, they’re all very chocolaty, but many recipes call for lots of cream or chocolate – neither of which is actually in the original Fudgsicle! The originals have just a few main ingredients, including skim milk, sugar and cocoa powder (as well as emulsifiers and flavorings). They’re simple, flavorful and low in fat and calories – all things that have kept these popsicles popular over the years.
So, when I set out to make my own homemade Fudgesicles, I wanted them to be as similar as possible to the originals. These are popsicles made with milk, cocoa powder and sugar – not ice cream shoved into popsicle molds! Everything is stirred together in a medium saucepan, then poured into popsicle molds. The size of your finished popsicle will vary on the size of your mold. I used Tovolo’s Groovy Popsicle Molds. Be creative if you don’t have molds, as you can easily make popsicles without a mold, too.
The Fudgsicles are delicious. They have a great chocolate flavor and are not too sweet. They are also not too icy and melt smoothly on your tongue. If you’re worried about them being too sweet from the sugar in the base recipe – don’t be. Things taste less sweet when they’re chilled, so even if the base tastes a bit sweet, it shouldn’t be a problem when the popsicles are done. The sugar (and the corn syrup or agave syrup – your choice) also keeps the popsicles from getting too hard and icy. You can leave out the little bit of corn syrup if you prefer, but your pop might be a touch icier as a result.
I’ll be making these again and again this summer – or at least making a few big batches to keep on hand for snacking on hot days!
+Continue Reading

Popsicles are classic summertime treats that never seem to go out of style. This is a good thing, because not only are they tasty, but they’re easy to make at home. You can pour almost anything into a popsicle mold – from fruit juice to a milkshake – and make a popsicle customized to your own tastes. There is only one thing that might hold you back when it comes to making popsicles at home: not having a popsicle mold. The molds are widely available (especially in the summer) and come in all kinds of neat designs. But you don’t need a mold to make popsicles at home at all!
To make popsicles without a mold, you need small, preferably narrow cups and popsicle sticks. You can find popsicle sticks at craft stores and small, disposable paper cups make great containers if you’re going to make a lot of popsicles. If you’re only looking to make a couple of pops (or just one as a treat for yourself!), simply pour your popsicle mixture into a small juice glass, stick a lightweight plastic spoon (unless you already have sticks on hand) into the cup and freeze. Run the glass under a little warm water to release the popsicle from the sides of the cup. You can even get creative with the containers that you use, too. And Then I Do The Dishes made popsicles in a loaf pan and used a knife to cut slices of frozen treats!
+Continue Reading