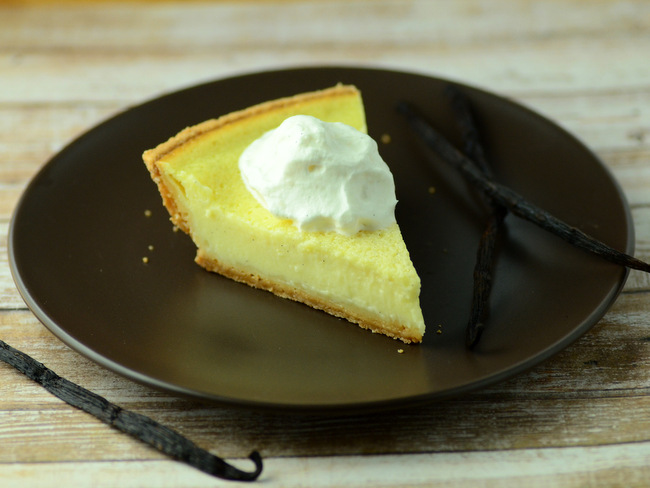
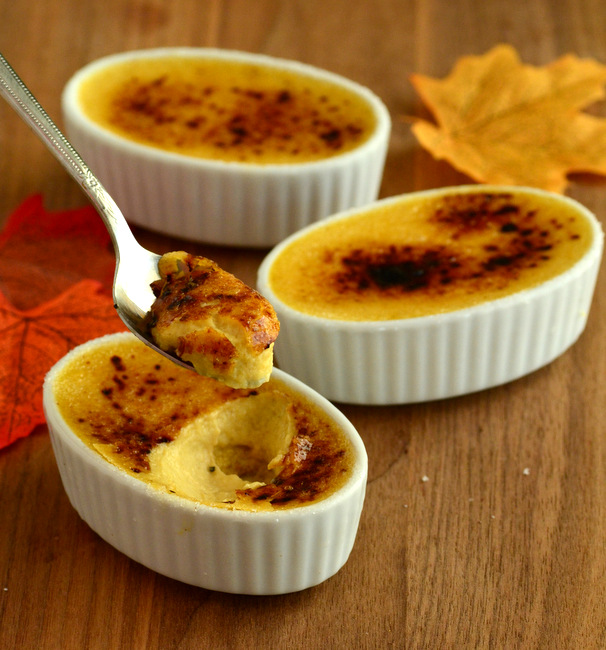
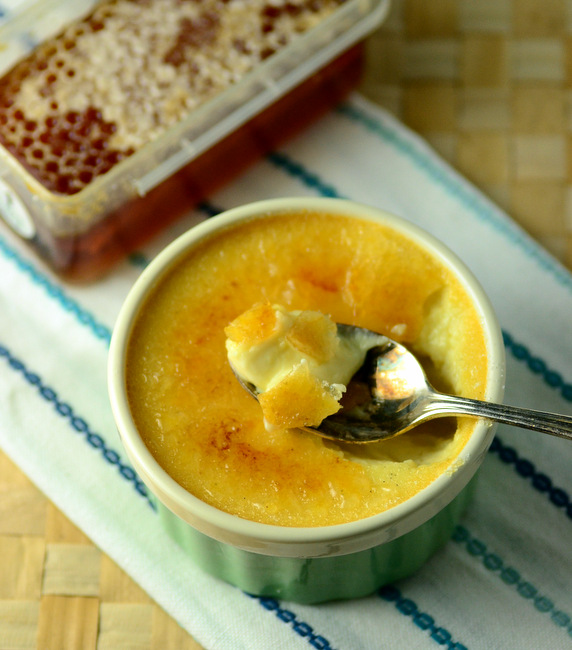
Archive for: custard

French Apple Cake

French Apple Cake
Custard, cake and apples all come together into one spectacular dessert in this French Apple Cake. The recipe was featured in a recent issue of Cook’s Illustrated (Sept/Oct 2012). Often, the test kitchen remakes recipes that I am already familiar with, looking for a better way to approach them. This time, I hadn’t heard of this particular kind of cake before, but it sounded too good to resist and I gave it a try as soon as I had a chance.

The cake is rich, eggy and custardy, with 1 1/2 pounds of thinly sliced apples packed into it. On top of that custardy layer is a thin layer of tender, fluffy cake. It’s a very unique combination of elements in this cake, but everything works together beautifully. The vanilla in the cake batter really comes through and is a nice compliment to the apples. I added a cinnamon sugar mixture to the top before baking, which made a fragrant and crisp topping. Making a layered cake like this one may sound like a daunting task when you’re looking at the picture of it, but it is surprisingly easy to make. The most difficult part of the recipe is peeling and slicing 1 1/2 pounds of sweet-tart Granny Smith apples when you start out!

The apples for this cake are cut into very small pieces that are cooked in the microwave prior to being incorporated into the cake batter. They’re cooked covered, so they actually steam in the microwave. This tenderizes the apples and helps them meld a little better into the finished cake, so that you get apple slices that still have some texture but aren’t too hard compared to the custard.

After my own testing, baking the cake several times, I found that I had a few changes over the test kitchen’s version of the recipe. First, I found that their recipe called for so much oil that while the cake was “moist” it was also greasy. I reduced the fat in the recipe by almost 25%. I also compared a cake made with melted butter one made with the oil they called for. While the oil version of the cake did taste good, I felt that the butter cake was just as moist and had a little bit better flavor overall. My taste testers couldn’t really tell the difference, however, so go ahead and use the oil if you want to keep things easy and you won’t miss out.
+Continue Reading

Crustless Raspberry Custard Pie

Impossible Raspberry Custard Pie
This Crustless Raspberry Custard Pie is not your typical custard pie. It is baked directly in a pie plate without a pastry or graham cracker crust beneath it, yet it still holds together well enough that you can easily slice and serve it, just as you would with a regular pie. The pie is creamy and tender, with more substance than you might expect a custard pie to have thanks, in part, to a generous amount of yogurt in the filling. It also has a nice vanilla-almond flavor and is a wonderful base in which to showcase fresh raspberries.

The secret to this pie is that it is a type of “impossible” pie. This type of pie has a very small amount of flour incorporated into the filling that forms a kind of “crust” beneath the pie as it bakes. This isn’t a crisp crust, but it is a slightly firm layer at the base that helps the pie hold together well. The resulting pie is less delicate than a more traditional custard pie, but it is also lighter (meaning lower in calories) than its traditional counterpart. It is also very easy to mix up and bake, even on very short notice.

Fresh raspberries, or another fresh berry, are the best choice for this dessert. The berries look beautiful in the pie and have a beautifully bright flavor against the custard. The pie can be served slightly warm, while it is fresh from the oven, or refrigerated and served chilled. I usually top mine with a little dusting of powered sugar, but a small dollop of whipped cream and a few extra raspberries can also make a perfect finish.

Crustless Raspberry Custard Pie

+Continue Reading

Coconut Custard Pie

Coconut Custard Pie
As a fan of coconut, I like it in most types of desserts and baked goods. This includes cakes, cookies, muffins and pies. Coconut cream pie is probably the most common type of coconut pie you’ll find. It is made with a pudding-like filling that is packed with shredded coconut and poured into a prebaked pie shell, very similar to a chocolate cream pie. Coconut Custard Pie is a little different than a cream pie and just might be a better way to enjoy coconut.

Coconut Custard Pie has an eggy custard base that is not pre-cooked, but baked right in the pie shell. Rather than having a pudding-like texture, it has a more delicate texture to it, like that of a creme brulee or other baked custard. Of course, this particular pie is also packed with coconut, so some of that delicate texture usually associated with baked custards is lost with the generous amount of shredded coconut that is also in the filling because that adds a lot of texture to the pie.

I use sweetened shredded coconut, but you can also use unsweetened without making any changes to the recipe. Some coconut pie recipes call for using only toasted coconut. You can use only toasted coconut in this recipe if you prefer that toasty flavor. I prefer to use untoasted coconut because I like the contrast it creates as the pie bakes: the top becomes crispy and toasted, while the coconut inside the filling remains slightly chewier. Either way, you end up with a pie that has terrific coconut flavor, a creamy and eggy base and a buttery, flaky pie crust.

Coconut Custard Pie
+Continue Reading

What are custard pies?

Sweet Potato Pie
A very simple custard of eggs, milk, sugar and vanilla (or some other flavoring) that is cooked on the stovetop or baked in small ramekins in the oven is the first thing that most of us think of when we think of a custard. A custard is a cooked mixture that is thickened with eggs, and while that simple custard may be the first thing that comes to mind, all kinds of other mixtures are custards as well. Custard pies are pies that are filled with a custard base – eggs, some type of liquid and sweeteners – and baked until the mixture is set. While that basic custard mixture can make a nice pie filling itself, pumpkin pies, sweet potato pies, buttermilk pies, chess pies and even pecan pies are all custard-based pies.

All custard pies need to be handled with care to get the best results. Here are a few tips that might come in handy when baking them, whether you’re doing a pumpkin pie for the holidays or a classic custard pie for another occasion:

  • Place your pie on a baking sheet and put it on the rack in the oven, then pour the filling from a large mixing cup to prevent spillage.
  • Custard pies should be baked until they jiggle slightly. Residual heat will help them firm up even more once they come out of the oven, but overbaking can cause cracking.
  • The easiest way to test for doneness is to insert a sharp knife into the center; the knife should come out clean, even though the pie still jiggles slightly.
  • Custard pies cut more easily with a smooth, hot knife. Run your knife under hot water and dry it off before cutting your pie.
  • Pies are at their best within a couple of days of baking, when the filling is at its most tender.

Classic Creme Brulee

Creme Brulee
Creme brulee is one of those desserts that most people only have in restaurants because they don’t know that it’s actually a very simple dessert to make at home. A basic creme brulee is a baked vanilla custard that is topped with a layer of caramelized sugar. The sugar snaps when you crack into it with a spoon, revealing the smooth custard below. The caramelized sugar can get a slightly burnt in places, adding a slightly bitter flavor that is actually a lovely contrast to the sweet, creamy dessert.

Another reason that many people don’t make creme brulee at home is that they feel it requires special equipment. Most creme brulees are served in small, flat dishes or unusually shallow ramekins where you get a high crust-to-filling ratio. You don’t need any special dishes: regular 4 or 6 ounce ramekins (or other similar sized, oven-safe baking cups) still make a very good creme brulee and have the advantage of giving you a thicker and more indulgent custard layer. The sugar is typically cooked with a kitchen torch, and you can caramelize yours under the broiler if you don’t have one. That said, a kitchen torch is one piece of equipment I would definitely recommend getting because (a) if is fun to use and (b) you’ll be more likely to make creme brulee when you already have one.

This creme brulee is starts by making an egg-rich custard on the stove. Since creme brulee should be an indulgent dessert, I use some heavy cream when making mine. You can infuse the cream with a vanilla bean in advance, or simply add vanilla flavor with vanilla extract – both options work well. As much as I like vanilla beans, using vanilla extract seems to let the naturally eggy flavor of the custard come through a bit more. Once the custard has been prepared, it is poured into ramekins and baked in a water bath. The water bath keeps the custard at a low, consistent temperature and prevents bubbles from forming and helps keep the top of the custard smooth. If the top of your custard browns a little bit during baking, don’t worry, as it will be covered with sugar when you brulee it.

The custards should be thoroughly chilled before adding sugar for the topping. I like to use super fine sugar, but regular sugar will also work (finer sugar is generally better for this than coarser sugar because it melts faster), and I put a generous layer on so I will have a nice, thick crust. I caramelize it using my kitchen torch, then allow the caramel to set for about a minute before serving. You end up with a crisp caramel that is still warm and a cool custard below. The creme brulees can be bruleed in advance and stored in the refrigerator, but it is best not to leave them in the fridge for more than 1-2 hours to ensure that the caramel will remain perfectly crisp when ready to serve.

Creme Brulee
+Continue Reading

Visit Us On FacebookVisit Us On PinterestVisit Us On TwitterVisit Us On YoutubeCheck Our Feed