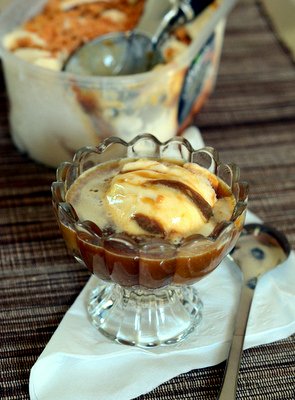
Archive for: caramel

Trader Joe’s Fleur de Sel Caramel Sauce, reviewed

TJ's Fleur de Sel Caramel Sauce
Towards the holidays, Trader Joe’s puts out all kinds of seasonal offerings. Their Dark Chocolate Sea Salt Caramels are always at the top of my list. Dark chocolate is a great combination with caramel most of the time, but with these candies I’m just in it for the silky smooth caramel and the crunch of coarse salt sprinkled on top of the candies. It is delicious and addictive. Naturally, when I spotted Trader Joe’s Fleur de Sel Caramel Sauce on the shelf, I had to pick some up.

The caramel sauce has a very similar consistency to the center of those dark chocolates I like so much: smooth and creamy enough to melt easily on your tongue. You can taste the sugar, butter, cream and vanilla in the caramel, too. There is no coarse sea salt here, but there is a noticeable amount in the the caramel and the contrast of sweet and salty will definitely make your mouth water. In short, the sauce is delicious. I also appreciate that, unlike its chocolate-wrapped cousin, it can be used in many applications, from topping off an ice cream sundae or giving a batch of brownies a sweet swirl.

How to make homemade Dulce de Leche

Sweetened Condensed Milk

One of the most frequently recommended ways to make Dulce de Leche is to put a can of sweetened condensed milk into boiling water and cook it for a period of 2-4 hours. This is not a good thing to do – and one look at the warning on a can of sweetened condensed milk will tell you why: the can can explode. This can happen when the water level in the pan gets to low, when the burner you’re using has a hot spot below your can, or when any other situation arises in which excess heat builds up in that can. I’ve used the method with good results – but it’s not worth the risk of stepping out of the kitchen and returning to a big mess of sweetened condensed milk everywhere, not when there is a safer method that is just as easy to do and that is even a bit faster.

This method for making dulce de leche uses a double boiler. Simply open a can of sweetened condensed milk and pour it into the top of a double boiler, where the bottom is already filled with a few inches of simmering water. With a double boiler, you don’t need to worry about the water evaporating while you cook, and since there is no pressure from a sealed can, there is no risk of an unexpected explosion (yes, it really does happen).
+Continue Reading

Caramel Apple Cider

Caramel Apple Cider

Once you’ve made some Spiced Apple Cider, or if you simply happen to have a bottle of storebought cider in the back of the fridge, it is a snap to make one of my favorite wintertime drinks, Caramel Apple Cider. I was first turned onto this drink on a visit to Starbucks, where it is generally available year-round but is often featured on the menu boards during the winter. The drink seems to retain heat much better than just about anything else, so not only does it taste great, but it keeps your hands warm when it is snowy outside!

The Starbucks version of this drink is made by steaming apple cider until it is very hot, then adding caramel and whipped cream. I start mine with homemade cider and heat it up in a saucepan if I am going to be serving a crowd and in a mug in the microwave if I’m only serving myself. Once the cider is steaming hot, stir in about 1 1/2 tbsp caramel sauce, then add whipped cream and another drizzle of caramel. Use any kind of caramel for this drink, whether it’s homemade sauce or your favorite topping brand – I’ve even melted solid caramels into it in a pinch and it turned out very well. I often add a very small pinch of salt to the caramel on top for that salted caramel effect, too.

The sweetness of the caramel highlights the sweetness of the apples in the cider, while the whipped cream on top is a nice, cool contrast to the steamy beverage below. And the caramel on top? Why, that’s just an excuse to eat even more caramel. As though I needed one.
+Continue Reading

Caramel Banana Cream Pie

Caramel Banana Cream Pie

A cream pie is usually a pie with a custard or pudding base that is topped off with a lot of whipped cream. In the case of banana cream pie, the standard recipe has vanilla pudding covering a layer of fresh banana slices – and whipped cream on top, of course. The standard is a classic because it has a good combination of flavors, it’s simple and it’s tasty. It’s also a little bit boring when it comes right down to it. This version of banana cream pie adds in another flavor to give the dessert a little more depth: caramel.

I made a caramel pudding to top off these bananas, and added a drizzle of caramel sauce to the whipped cream before serving to further boost the caramel flavor. The caramel pudding has a nice, subtle buttery flavor to it, but still keeps the nice vanilla notes that you’ll find in plain pudding. It’s easy to make from scratch and there is no need to use a candy thermometer to keep track of the temperature of the caramel. All you have to do is watch the color of the sugar as it cooks, looking for it to turn a golden color all over before adding in the butter.

If you make pudding from scratch a lot, you’ll notice that I use quite a bit of cornstarch to thicken this caramel pudding. I wouldn’t normally use this much, but it’s important that a cream pie be easy to slice and hold its shape well when sliced (otherwise you might as well just leave out the crust eat the pudding with whipped cream), and this cream pie holds up extremely well when sliced. The pudding stays soft and tender, even if you store the pie for a day or two before finishing it, so don’t worry that the extra cornstarch will make it unpleasantly stiff.

I added whipped cream to each slice as it was served, since I was not serving the whole pie at once. For the best presentation, make a batch of whipped cream and spread it over the pie before serving.
+Continue Reading

Homemade Girl Scout Cookies: Samoas Bars

Samoas Bars, stacked

I love the look of the original Samoas Girl Scout Cookies, but making them from scratch can be a little bit time consuming. This is largely because the dough must be rolled out, cut out and then each of the cookies has to be handled individually for topping. The results are well worth it, in my opinion, but we don’t always have time to make a labor-intensive recipe – no matter how bad a craving for Girl Scout cookies gets.

Bar cookies are the perfect solution.

This is basically a shortcut recipe that still delivers all the great samoas flavor without some of the more tedious parts of cooking making. These bars have a buttery shortbread base that is topped with the caramel-coconut samoas topping and chocolate. It is made in three stages. First, the shortbread is baked and cooled. Then, the coconut topping is applied. Put the coconut on while it is hot, so it will be fairly easy to push it around. It’s a thick mixture, but a spatula is all you need to press it into an even layer. The bars should be cut after the topping has been applied, and even though the shortbread has a melt-in-your mouth quality to it, the topping holds the bars together well. I recommend using a large knife or a pizza cutter to slice up the bars easily and neatly; small knives don’t work quite as well.

The final step is to dip these in chocolate once the topping has set. Since samoas have chocolate on the bottom and a chocolate drizzle on top, I kept that same look for my bar cookies. If you want something a bit simpler, just dip half that bars in chocolate – or skip the dipping in favor of a drizzle. The important thing is that all the flavors get into the batch. And that you have some friends to share these with, because they can be quite addictive.

Samoas Bars

+Continue Reading