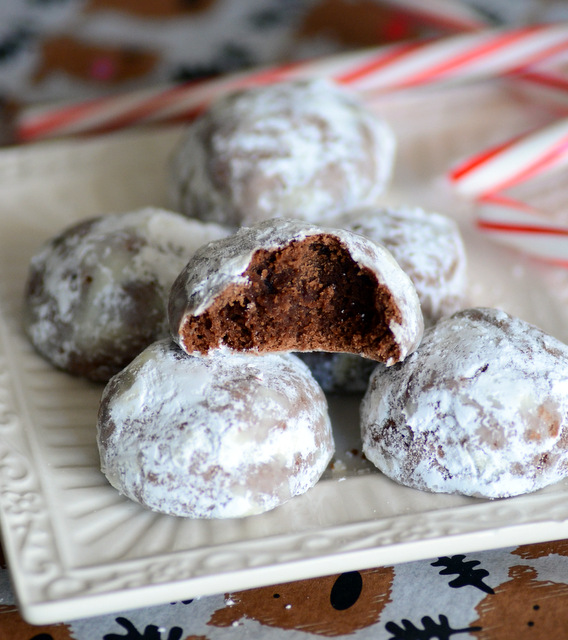
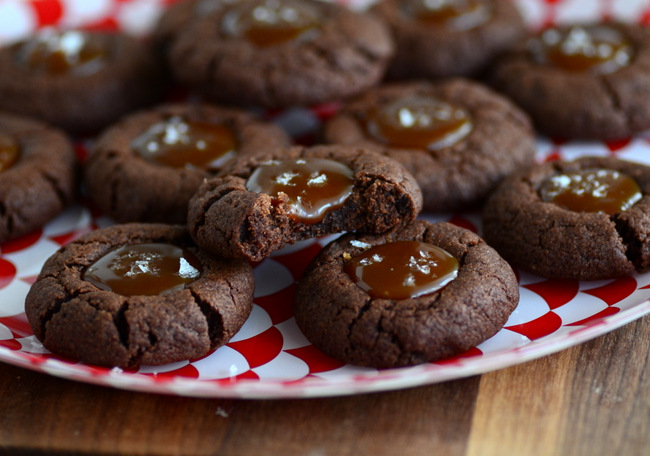
Archive for the ‘Chocolate’ Category

Sweetened Condensed Milk Fudge

Sweetened Condensed Milk Fudge
Fudge is a rich, easy to make candy that will always satisfy the sweet tooth of a chocoholic. I like to make it around the because it makes a good gift and is very easy to ship, since you don’t have to worry about anything going stale between the time you make it and the time that your recipient gets the package.

This is a plain dark chocolate fudge that uses sweetened condensed milk. The sweetened condensed milk is very sweet and creamy, and it makes for a fudge that is quite smooth and has none of that grainy texture that you will find in some fudge recipes. It is also a neat ingredient because it allows you to streamline the process of making fudge and eliminates the need for using a candy thermometer. I add a little vanilla and a pinch of salt to the fudge to smooth out the darker notes of the dark chocolate. The finished fudge has a great dark chocolate flavor, a very rich texture and a hint of vanilla in the finish.

The easiest chocolates to use for making a fudge recipe like this one are semisweet chocolate chips, which are a type of dark chocolate. Since you really taste the chocolate flavor in the finished fudge, however, I recommend taking a little time to make sure you are using a dark chocolate that you really like the flavor of (I used Callebaut, but have also used Guittard chocolate for this). You will notice a difference in the finished fudge when you start with a higher quality chocolate at the beginning.

This fudge keeps very well when stored in an airtight container. I prefer to stack the pieces with sheets of parchment paper in between the squares to keep them from sticking together until they can all be eaten. I recommend cutting the fudge into small squares, as it is quite rich and large, brownie-sized pieces might be a little too much.
+Continue Reading

Peppermint and Cacao Nib Bark

Peppermint and Cacao Nib Bark
Peppermint bark is a type of chocolate bark where layers of white, dark and/or milk chocolate are topped off with a generous sprinkle of crushed peppermint candies. Many big chocolate brands, including Dove and Ghirardelli, release their own take on peppermint bark during the holidays, and even Haagen-Dazs has a limited edition peppermint bark ice cream flavor. But peppermint bark is easy to make at home if you have some chocolate and peppermint candies – or even candy canes – on hand and I always prefer it to store-bought.

My Peppermint and Cacao Nib Bark is topped with lots of crushed peppermint – like a traditional peppermint bark – and also with cacao nibs. Cacao nibs are small pieces of roasted, chopped cocoa beans and they add a nice additional chocolate flavor and quite a bit of crunch to the bark. The base of the bark is made with a layer of dark chocolate and a layer of white chocolate, as white chocolate always sets off peppermint well. Use a good quality chocolate that you like the flavor of (I used Callebaut) for the best results.

You can buy peppermint bits that are already crushed at many cake decorating stores, and those are a good and easy option for a recipe like this one. You can also make them, by crushing peppermints or candy canes yourself. If you do crush them yourself, sift them through a strainer to remove any of the peppermint dust and just keep the nice pieces.

I tempered the chocolate for my peppermint bark, which gives it a nice sheen and allows the chocolate to set up very quickly with no refrigeration required. Read my guide on How To Temper Chocolate at Home for tips and instructions. If you don’t want to temper your chocolate, you can still make the bark, but you may want to pop it in the refrigerator after you make it to help it set up. This bark is a great holiday treat and also makes a wonderful gift for friends and family. Feel free to double the recipe if you need a big batch, though it may be easier to simply make multiple batches if you really need a lot.

Peppermint and Cacao Nib Bark
+Continue Reading

Halloween Candy Lava Cakes

Milky Way Midnight Lava Cake

When you have fun sized Halloween candies left over after the trick-or-treating is through, the obvious thing to do is to simply eat it yourself over time. As good as those tiny candies are, however, they get boring after a while. I like to put mine to good use in other baked goods and these Halloween Candy Lava Cakes are one of the absolute best ways to use them up.

Chocolate lava cakes, also known as molten center chocolate cakes, have a gooey chocolate center that oozes out of the cake when it is served. They’re decadent, and always a hit with chocoholics. Typically, I put a chocolate truffle at the center of each cake before baking. The truffles melt in the oven and ooze out of the warm, baked cakes and leave you with a very rich molten cake. For this Halloween variation, I placed squares of Halloween candies – mini Snickers, Milky Way, Milky Way Midnight, Caramel Snickers, Peanut Butter Snickers, etc. – inside of my lava cake batter before baking. The results were delicious! Those tiny candies added some fun flavors to the cakes because they have such diverse fillings. Some added caramel, while others added chocolate, nougat or peanut butter. The cakes themselves are very tender and  have a rich dark chocolate flavor.

I recommend looking for the square mini candy bars for this recipe, as they fit perfectly into the muffin cups. If you have the “fun size” candy bars, which are rectangular, you should cut them in half to form two squares before adding them in. You can really use any kind of candy, but bars with softer fillings tend to give you the best molten cake effect. I really liked Snickers bars (bottom picture), which add a salty peanut and caramel combination to the cakes, and Milky Way Midnights, which have a marshmallowy filling (top picture).

Mini Halloween Candies!
+Continue Reading

Chocolate Spice Angel Food Cake

Chocolate Spice Angel Food Cake

I have to admit that a vanilla bean angel food cake is my favorite, when it comes to these towering and cloud-like cakes. Vanilla can become very expressive when it is the main flavor on such a light and airy cake. That being said, angel food cakes are mostly flavored with vanilla alone and it has become quite uncommon to see them in other flavors. This is a shame, because as good as vanilla is, mixing it up with other flavors can make for a great angel food cake and a welcome change of pace from the usual.

This Chocolate Spice Angel Food Cake is a good example, incorporating not only a chocolate flavor into the cake, but a hint of spice to give it some depth and complexity. Angel food cake is leavened entirely with beaten egg whites, and that is why the cake is so fluffy. When adding chocolate to the cake, I think that you get the best results by adding cocoa powder into the batter, because it delivers a strong chocolate flavor while keeping the cake as fluffy as possible. I also added a bit of cinnamon and some ground cloves, both of which work nicely with the chocolate and deliver some unexpected flavors when you go to serve the cake! The finished cake is soft and airy, with a light sweetness and a nice cocoa flavor. The cinnamon combined with the cocoa almost reminds me a bit of spiced hot chocolate, too.

The recipe uses cake flour, and it calls for it to be sifted before you measure it. The best way to do this is to place your measuring cup on a large sheet of parchment or wax paper, then sift the flour over the measuring cup. Keep going until the cup is full, the level it off with a knife. Leftover flour can be funneled back into the container of flour with the paper. Measure the cocoa powder out the same way, then sift the two ingredients together with the spices and part of the sugar to combine them before they are added to the cake. It may seem like an extra step (or two), but getting any lumps out of the flour and cocoa is one of the secrets to a perfect chocolate angel food cake.

Chocolate Spice Angel Food Cake

+Continue Reading

Fudgy One Bowl Brownies

Fudgy One Bowl Brownies
I think that everyone should have one go-to brownie recipe. This One Bowl Brownie recipe is mine. The recipe takes just a few minutes to put together and I typically have everything that I need to make it on hand at any given time. Brownies are a huge crowd pleaser, so they’re perfect for almost every situation when you need or want a baked good. Plus, you can put any number of spins on the basic recipe by adding nuts, chocolate chips, dried fruit, frosting or ice cream to it, which means that it never gets boring.

The brownie recipe is very straightforward, using cocoa powder and dark chocolate to give them a rich chocolate flavor. I’ve seen brownie recipes that have a lot more chocolate in them than these do, but believe me when I say that you get a lot of chocolate into every bite with these. Sometimes, I find that adding more chocolate can just make the brownies heavy and more like a block of fudge than an actual brownie.  And, for those times when I am really craving chocolate, I can always stir in some chocolate chips for even more chocolate in these. There is no leavening in the recipe, which keeps the brownies dense and moist.

To me, a one bowl recipe means that everything can be measured out straight into one bowl and easily mixed together. These brownies definitely fit that definition and I frequently measure things out directly into the mixing bowl. Plus, you don’t even need a mixer for this recipe because it comes together fast with a simple whisk or spoon. In fairness, if you don’t have a microwave-safe mixing bowl, then you should melt your butter and chocolate together in a smaller microwave-safe bowl first. This adds a second bowl if you need to do it, but fortunately small bowls always seem easier to clean than the big ones, so it won’t make much of a mess.

To demonstrate just how easy to make these are, I even put together a short video that will walk you through the process:

+Continue Reading

Visit Us On FacebookVisit Us On PinterestVisit Us On TwitterVisit Us On YoutubeCheck Our Feed