Archive for May, 2010

S’mores are – and probably always will be – a favorite summertime treat of mine. And I doubt that I will ever tire of coming up with creative new ways to combine s’more ingredients into new dishes. This time around, I looked at my bag of marshmallows, my package of Hershey’s bars (the classic chocolate, although other bars can be used) and a box of graham crackers and the idea of putting them all into a bread pudding slowly began to take shape.
This bread pudding starts off with a base recipe that I often use for bread pudding: a mixture of cubed sandwich bread, milk, half and half, eggs, sugar and vanilla. I stirred in the chopped Hershey’s bars, graham crackers and marshmallows to really put s’mores into my bread pudding. I used a little less sugar than I might ordinarily use because of the marshmallows that went into the mix, but another way to tone down the sweetness a little bit would be to used chopped dark chocolate instead of milk chocolate.
The marshmallows roast up perfectly in the oven, and when the bread pudding is still warm and the chocolate is still melty, it really does capture that s’more flavor in each slice! The only thing missing is the crunch of the graham crackers, which loose their shape (although not their flavor) while the bread pudding is in the oven. A few pieces of graham cracker as garnish will add that same crunch if you’re missing it. That said, I liked it plain, but it looked pretty with the crackers when it was plated.
When making a bread pudding at home, you don’t need to be precise with the amount of bread – or graham crackers, in this case – that you use. Estimate as you measure and err on the side of adding a little extra bread rather than too little, as a bread pudding will still be moist with a handful of extra bread cubes but might be too wet or set improperly when not enough are used.
+Continue Reading
When I mention snack cakes, you might think about Twinkies or cream-filled Hostess Cupcakes, but snack cakes are not all prepackaged confections. Snack cakes are any type of small cake, cupcake, sandwich cookie or other snackable treat that you find packed away in school lunches, sold at bake sales or offered up to friends with coffee. The Complete Idiot’s Guide to Snack Cakes is a great little book that is devoted to these individually sized sweets, starting with the history of what makes a snack cake so great and working through over 100 recipes for any variation you can think of.
The book starts off, like so many cookbooks, with an introduction to baking techniques and to the types of equipment that you’ll need to have in your kitchen for making these recipes. If you’re interested in baking snack cakes, you’ll probably go straight for the Classic Cream-Filled Chocolate Cupcakes and the Cream Filled Sponge Cakes (cough *Twinkies* cough), but there are lots of other filled cakes, bars, brownies, crumb cakes and even miniature pies.
Although you might think that the book is just for complete beginners – and it does make it easy enough for almost anyone to make these recipes – it really is a much more versatile book. The recipes include donuts and cream puffs, with flavor combinations that anyone who likes to bake – yes, even experienced cooks – will love. And believe me, it never hurts to have lots of tips and reminders pop up at you as you go through the book because it just helps make you a better baker in the end.

In Madrid, there is one dessert place that is a must-visit destination. That is Chocolateria San Gines. This chocolate shop has one specialty and that is Churros con Chocolate. The chocolate is thick, rich and pudding-like, and the churros are light and crisp. The combination is pretty much the only thing on the menu and the waiters tend to assume that this is what you want when you walk in (a good thing when you don’t speak all that much Spanish). The shop is open almost 24 hours a day, serving up this specialty as a snack, as breakfast and as dessert.
On my recent trip to Spain, of course I made it a point to stop in and I wasn’t let down. But I also wanted to be able to recreate this delicious snack at home when I got back. Fortunately, it turns out that the recipe for their Churros con Chocolate is available on the Food Network website!
The churros are unusually light because they start out with a dough that is very similar to the choux pastry used for cream puffs. This makes them very crisp on the outside and very tender, as well as very slightly eggy, on the inside. Although they are deep fried and it does take the oil a while to heat up, the recipe is pretty easy to mix up and make, but expect to spend some time over the stove because the churros will have to be fried in batches.

The chocolate sauce is somewhere between hot chocolate and chocolate pudding, with a consistency that is jsut the right thickness to drip the churros into, but still liquidy enough that you can drink the leftovers when you’re done. The sauce can be mixed up while you’re frying churros and reheats well. I recommend pouring it into small mugs or other individual cups so everyone has their own dipping (and drinking) container to work with.
You’ll probably notice that my churros, unlike the churros that you find at the ball park, are not completely straight. This is because these churros start to curl slightly as soon as they hit the hot oil, largely because it is not a heavy batter. Don’t worry about this. Not every one I had in Spain was perfectly straight either and I promise that they’ll taste just as good whether they come out straight as an arrow or curvy as an “s” – especially if you make the chocolate sauce to go along with it.
+Continue Reading

There are many ways to get a spicy, gingery flavor into baked goods. One of the easiest is to add dried, ground ginger right into your batter or dough, just as you might add in ground cinnamon or any other dried spice. This adds a lot of flavor, but if you want even more of a gingery bite, opt for grating in fresh ginger, which has a stronger flavor. My favorite way to increase the ginger flavor in a baked good or other sweet recipe is to add in candied, or crystallized, ginger.
Candied ginger is thinly sliced ginger that has been cooked in a sugar syrup until it becomes sweet and tender. It retains its gingery bite, but it takes on a sweetness that ginger just doesn’t have by itself. Once prepared, the ginger can be used as it is, or it can be dipped in sugar to add a crisp, sweet coating. After it has been cooked, the ginger is easy to slice and can be diced up with a knife and added to recipes. Unlike fresh ginger, which can have a flavor that is a little too aggressive for some cookie (and other sweet) recipes in big chunks, adding chunks of candied ginger to a cake or cookie can add a lot of spice tempered by just the right amount of sweetness.
I always assumed that candied ginger was ginger that was simply cooked in syrup and crystallized ginger was the type that was dipped in sugar. Some producers label their products that way, but it seems as though the two terms can be used almost interchangeably. The products can definitely be used interchangeably in recipes. I’ll still use “crystallized ginger” in my recipes because I like that extra sweetness and crunch that that sugary coating adds to the spicy bite of the ginger.

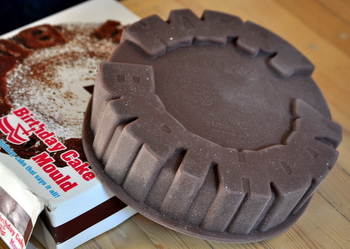
I really like the idea of a birthday cake that doesn’t need any frosting to say “happy birthday” and is still clearly a birthday cake, as opposed to your average, everyday cake. After all, it’s nice when birthday cakes are a little bit special for the occasion. So, this silicone Birthday Cake Pan really appealed to me when I first heard about the design. It is a silicone pan that bakes the words “happy birthday” right onto a cake. I couldn’t resist trying one when I had the chance, to give the pan a dry run before I baked a real birthday cake in it.
The cake pan is good looking and performs like most silicone pans do, meaning that it is a bit floppy and really needs to be braced on a baking sheet when you put it in the oven. But it does work as advertised and cakes come out with a big “happy birthday” around the outside of each layer, as you can see below. There are a few minor things to note about this pan if you decide you want one, however. First, the impressions in the cake pan are not very deep, so denser cakes, brownies and even fudge are going to give you the best results. Second, some cakes will stick in the corners of the letters a little bit, so make sure that your cake cools completely in the pan before turning it out. Finally, even though the pan is nonstick, greasing and flouring the pan will help the cake come out even more easily and will give the letters some definition.
+Continue Reading