
There are times when the best recipe is the most straight-forward. I mean, there are many breads that pair perfectly with different types of meals. For example, you might only like challah (link) for french toast and might perfer a hearty rye bread (link) for soups. A lighter loaf, like honey buttermilk or wheat (links), could be your prefered bread for sandwiches. This bread can be used for all of that. It is a simple, suprisingly flavorful white bread that is outstanding for everything from mopping up soups to making toast, though it may have to be trimmed to fit into your toaster.
I will also take this opportunity to mention how important it is to follow all the steps of a bread recipe. Generally, the process is as follows: mix, knead, rise, knead/shape, rise, bake. The trickiest part is the kneading and shaping after the first rise. When the dough is mixed, you want to handle it firmly, kneading vigourously to develop the gluten and produce a satiny, elastic dough. After that first rise, the dough must be handled more gently. Air pockets have developed in the dough and, to achieve the best textured bread, you do not want to force them out. On the other hand, the air pockets will be irregularly distributed and overly large if you skip this step and go straight into a second rise. This is why the majority of bread recipes instruct you to “gently deflate” the dough after that first rise. It lets out excess air and distributes the rest evenly. It also makes the dough easier to shape. Shaping takes practice and nothing else will be able to completely compensate for experience.
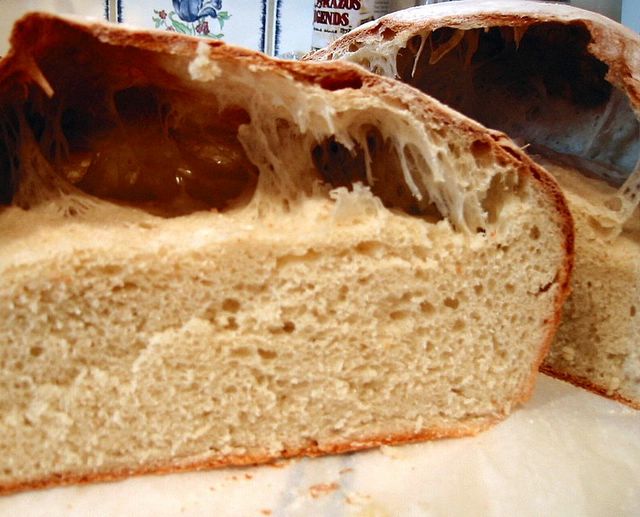
What happens if you don’t deflate the dough? Click here to see. In my bread, I “shaped” it too gently – by which I mean that I didn’t shape it at all – and got a huge pocket in my final result. I took it, very, very gently, from the bowl it was rising in and placed it on a cookie sheet to rise again. This probably won’t happen with your bread and I have since made this loaf many times without problems, so don’t worry about getting a strange outcome like this one. But it does illustrate my point that gently deflating is necessary.
This bread also has a sponge, which means that the yeast is given extra time to ferment before being added to the dough. It adds an extra step at the beginning of the recipe, but doesn’t change anything about kneading and shaping the dough.
Rustic Country Bread
Sponge:
1 tbsp active dry yeast
1 cup water, warm (110F)
1 cup bread flour
Dough:
5 cups bread flour, approximately
1 1/3 cups water, warm (110F)
2 tbsp honey
1 tbsp salt
Make the sponge:
Dissolve yeast in warm water and stir in flour. Let rest for at least one hour (or up to 5, as time permits).
Make the Dough:
In a large bowl, combine the sponge, 2 cups of flour, water, honey. Add salt and remaining flour, stirring in about 1/4 cup at a time until the dough comes together into a ball. Turn out onto a lightly floured surface and knead until elastic – about 5 minutes. Place in a lightly greased bowl to rise until doubled, about 1 hour.
Turn dough out onto a lightly floured surface and gently deflate. Shape into a ball and place on a baking sheet sprinkled lightly with cornmeal. Flour the top of the loaf and cover with a clean dish towel. Let rise for 45 minutes.
Preheat oven to 450F.
Bake for 35-40 minutes until the crust is dark brown. An instant read thermometer (meat thermometer) inserted into the bottom of the bread will read 205-210 F.
Cool completely on a wire rack before slicing.
Makes one large loaf.
Note: I don’t generally do this, but if you oven is large enough, add a small pan of water to the very bottom rack, below the bread, to create steam while the bread cooks. This will produce a better crust.


Amy
March 23, 2006I’ve had loaves come out with that pocket. Thank you for explaining why!
Gustad
March 23, 2006looks like you can crack an egg on that crust! (thats a good thing)
Barbara (Biscuit Girl)
March 23, 2006If you don’t have room in the bottom of the oven for a pan of water you could use a spray bottle of water to mist the inside of the oven. Do this about 3 times during the first 10 – 15 minuntes of cooking. You’ll get a nice crust.
Kate
March 23, 2006beautiful picture!
after my relative success with soda bread, i think i’m ready to move to bigger and yeastier things. i’ll definitely be using this recipe!
Anonymous
March 26, 2006Hello Nic,
This was a bit ambitious for me since I haven’t ventured into yeasts, so I picked the Rosemary and Olive Bread which seemed foolproof.
I have only one question. It’s a tad salty, I was thinking maybe only 1 teaspoon salt not 1 tablespoon as it says? I already used rock salt so I wonder what 1 T of fine salt would have produced.
Huge fan,
Ria
Nic
March 27, 2006Ria – The olives in that bread will make it salty, so it’s best to serve it with a creamy cheese or perhaps to track down some milder olives for it.
Roggie
May 15, 2010Hi Nicole. I would like to know what type of salt was used in this recipe. I like to use kosher salt and would like to know what the amount would be. Thank you.
Catalina
May 24, 2012I doy led the recipe since I’m going to send one loaf to my aunt and leave the other one here at home. Looks amazingly delicious, can’t wait until they’re done!!
Catalina
May 24, 2012I meant I doubled but my iPhone wrote something different since my first language is Spanish 🙂